Course Progress
Step 1 Select a Niche
- Introduction To The Ecomm Clubhouse (Please Watch First!)
- Shopify vs. Etsy (Which Should You Sell With?)
- How I Hack Algorithms By Choosing A Store Niche
- Phase 1 Of Niche Selection: Brainstorm 20 Ideas
- Phase 2 Of Niche Selection: Narrow 20 Ideas To 5
- Phase 3 Of Niche Selection: Pick Your Winning Niche
- Choose A Store Name (That You Won’t Regret!)
Step 2 Source & Choose Products To SELL!
- How To Research & Spy On Winning Print On Demand Designs
- How To Create Product Designs With Canva
- How To Add Distressed Vintage Textures For FREE
- How To Create FREE Print On Demand Designs
- How to Get Custom Designs Created Using Fiverr
- How I Download Free Pictures & Photos To Turn Into Products To Sell
- How To Get Instant Designs For Products With Shutterstock
- How I Use Free DALL-E AI Art For Print On Demand Products
- BONUS VIDEO! The Secrets Of 6-Figure & 7-Figure Print On Demand Products
- How To Pick Viral & Top Rated Aliexpress Products To Sell
- How To Choose The Best China Aliexpress Supplier
- How to Select the Right USA Aliexpress Supplier
- How to Price Products
Step 3 Create & Run Your Store
- Introduction (Please Watch First!)
- How to Create a Shopify Account
- How To Install The Free Shopify Theme Craft
- How to Create a Printify Account
- How To Create An Account With Printful & Install It
- How to Create a Product with Printify
- How To Create A Product With Printful (T-Shirt Example)
- How to Install DSers
- How to Install the Chrome Extension
- How to Add China-Dropshipped Products with DSers
- How to Add USA-Dropshipped Products with DSers
- How to Update Product Pages
- How to Add Collections
- How to Create an About Us Page
- How to Create a Contact Us Page
- How to Create a Refund Policy Page
- How to Set Up Payments
- How to Add Legal Pages
- How to Add Menus
- How to Create A Logo
- Customize Design Settings & Homepage For Craft Theme
- How to Add Shipping
- How to Edit Confirmation Email
- How to Edit Abandon Cart Email (optional)
- How to Add Live Chat
- How to Buy a Domain Name
- How to Remove Store Password
- Use Placeit To Create Lifestyle Photos
- Create A Printify Account & Product For Etsy
- Create A FREE Etsy Store
- Connect Printify Products To Etsy
- Optimize Etsy Products For Etsy Search Engine Traffic
- How To Successfully Appeal A Temporary Etsy Ban
Step 5 How to Get TRAFFIC & BUYERS To Your Store
- How I Get Free Traffic & Sales To A New Etsy Store
- My 3 Point System To Optimize Etsy Products For Free Traffic
- How I Optimize Etsy Store Profiles For Free Traffic
- How I Use Etsy Ads To Boost My Free Traffic & Sales
- My Exact Low Budget Etsy Ad Strategy
- Introduction To FREE Google SEO Traffic (Watch First!)
- How to Find Low Competition Keywords
- How to Optimize Product Pages
- How to Optimize Product Category Pages
- How to Optimize Your Homepage
- How to Add & Optimize Blog Posts
- How to Build Backlinks With Instagram Pages
- How to Film A Mobile Video For YouTube Shorts/TikTok/Reels
- How To Edit A Mobile Video For YouTube Shorts/TikTok/Reels
- Introduction To Facebook Ads (Watch First!)
- How to Create a Facebook Business Account
- How to Create a Facebook Fanpage
- How to Install the Facebook Pixel
- How to Create a Showcase Video Ad
- How to Edit a Showcase Video Ad
- How to Create an Example Video Ad
- How to Edit a Example Video Ad
- How To Create A Low-Budget Facebook Ad Campaign
- How To Create A 3-Ad Creative Facebook Ad Campaign
- How to Scale Facebook Ads
Step 6 How To Run & Manage Your Store
CUSTOMIZE THE DESIGN SETTINGS & HOMEPAGE FOR THE SHOPIFY THEME - craft
1. In your dashboard, click ‘Products’. Then select ‘Collections’.
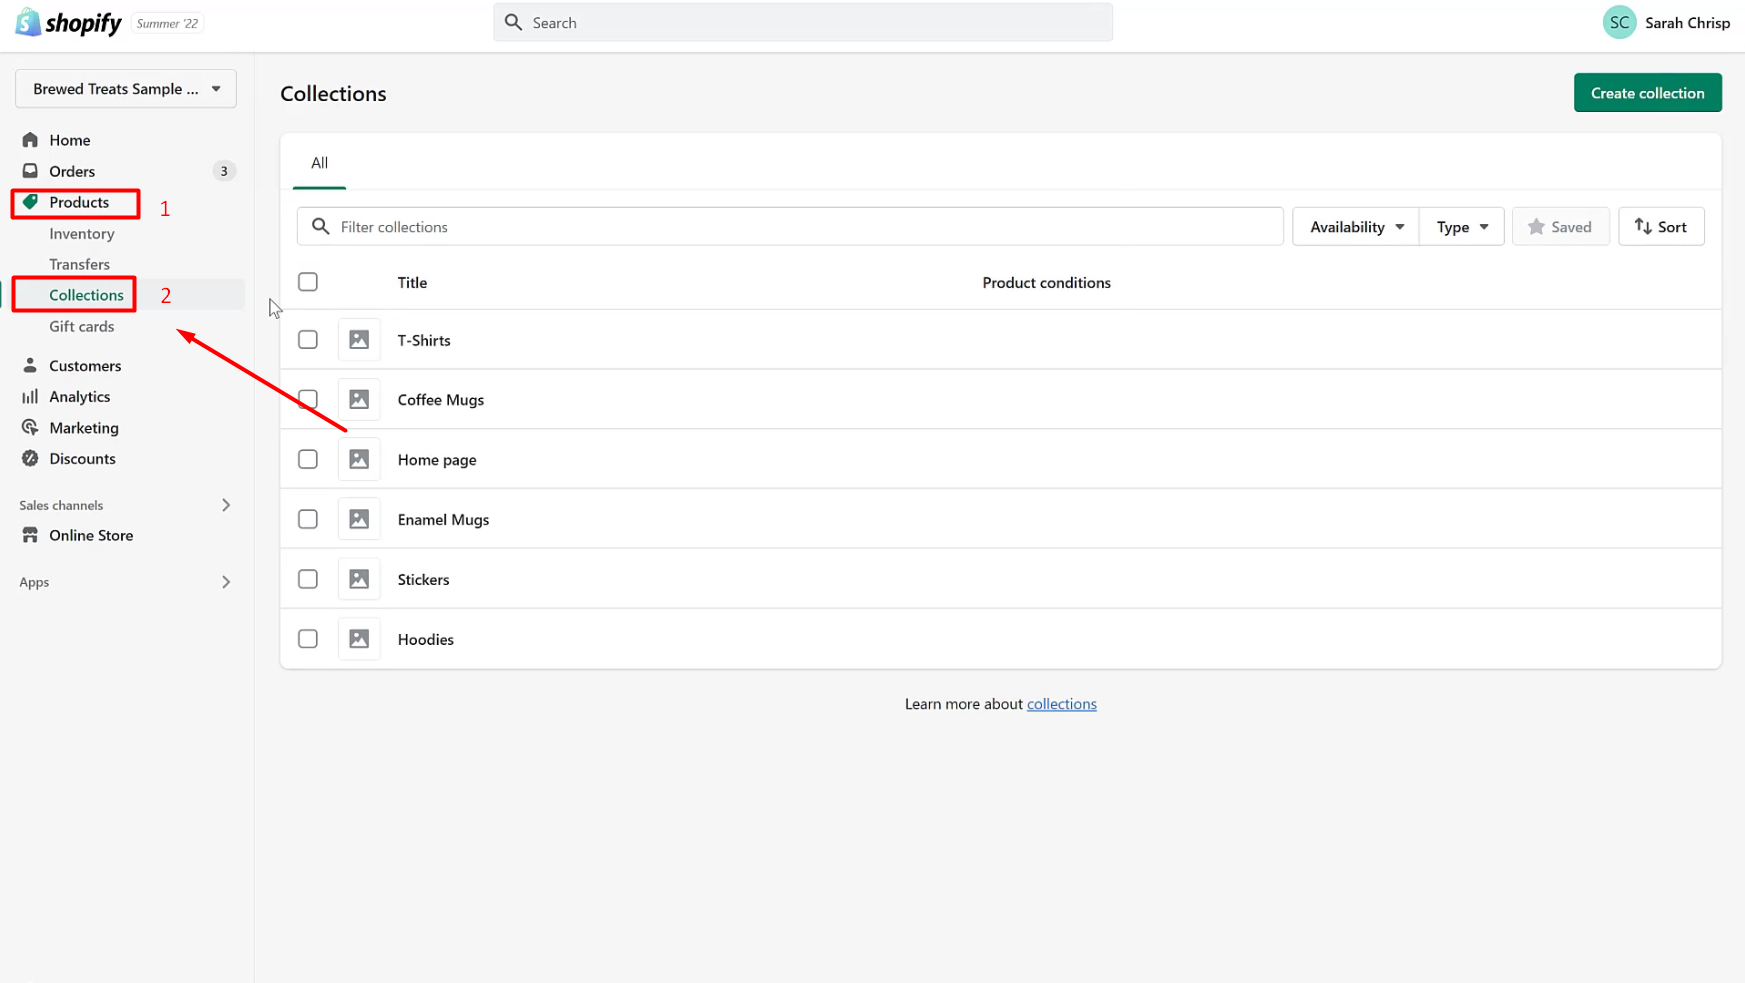
2. You can have at least 4 collections in your store. If you want to add a collection, you can go ahead and click ‘Create Collection’. But for now, let’s select 4 collections and click on one of the collections that I already added beforehand. Click on T-shirts for example.

3. Now click on ‘Add Image’ to change the collection image. Select the image you want to use for your collection then click ‘Open’.
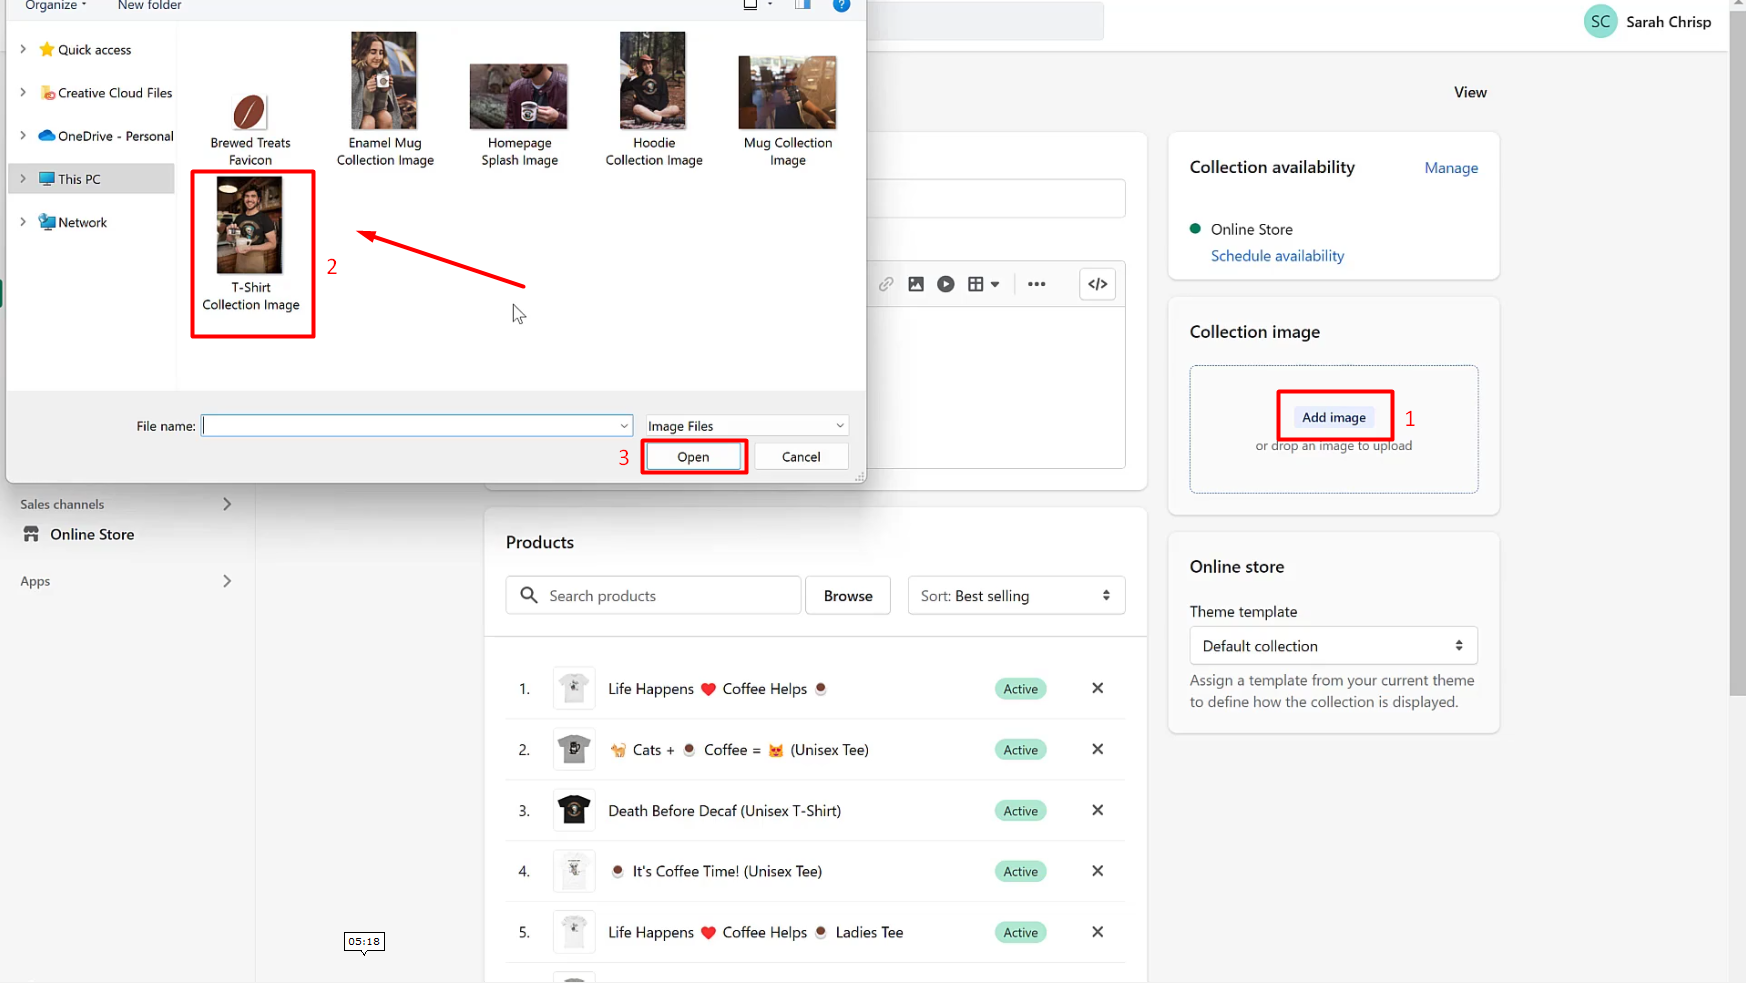
4. Now click ‘Save’. After saving, go back and do it for the other chosen 3 collections as well.

5. Now, let’s do one final thing with our collections. We need to create a collection to showcase our 4 favorite products. If Shopify has a Homepage collection created already, we have the option to select that or create a separate collection which we’re going to do for this tutorial. Click on ‘Create Collection’.
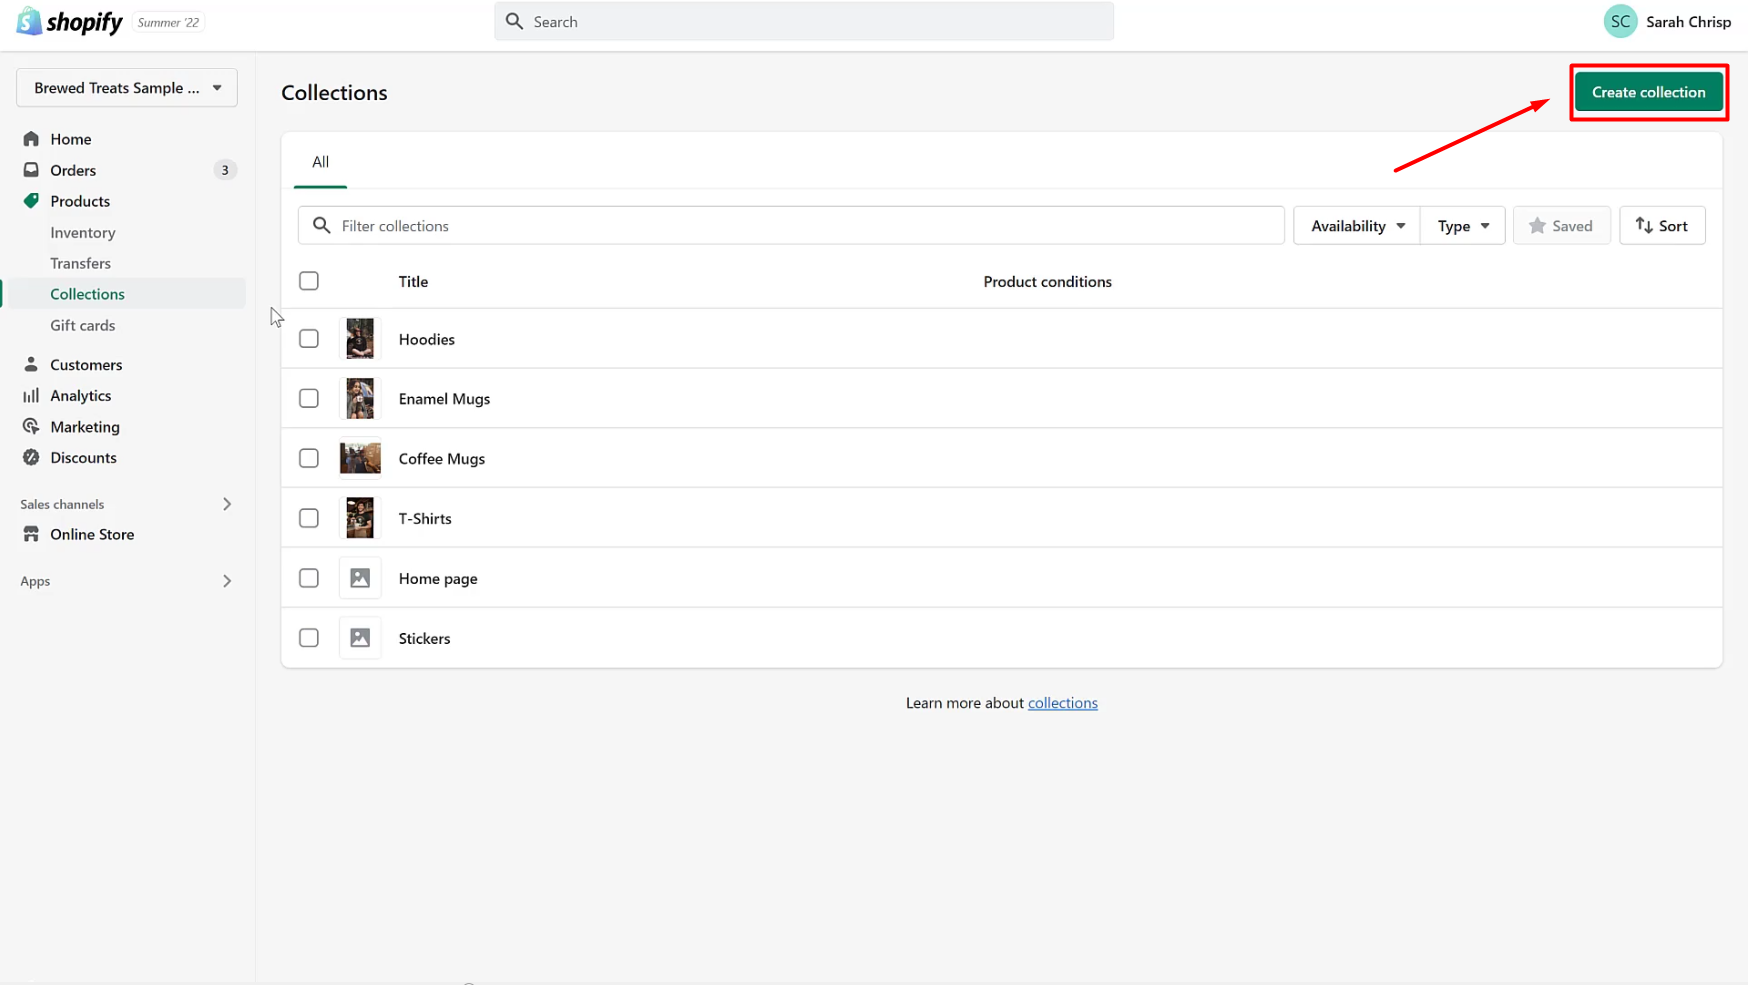
6. Let’s type in ‘Best Sellers’ as the Collection name. Click on Manual as collection Type. Then click ‘Save’.

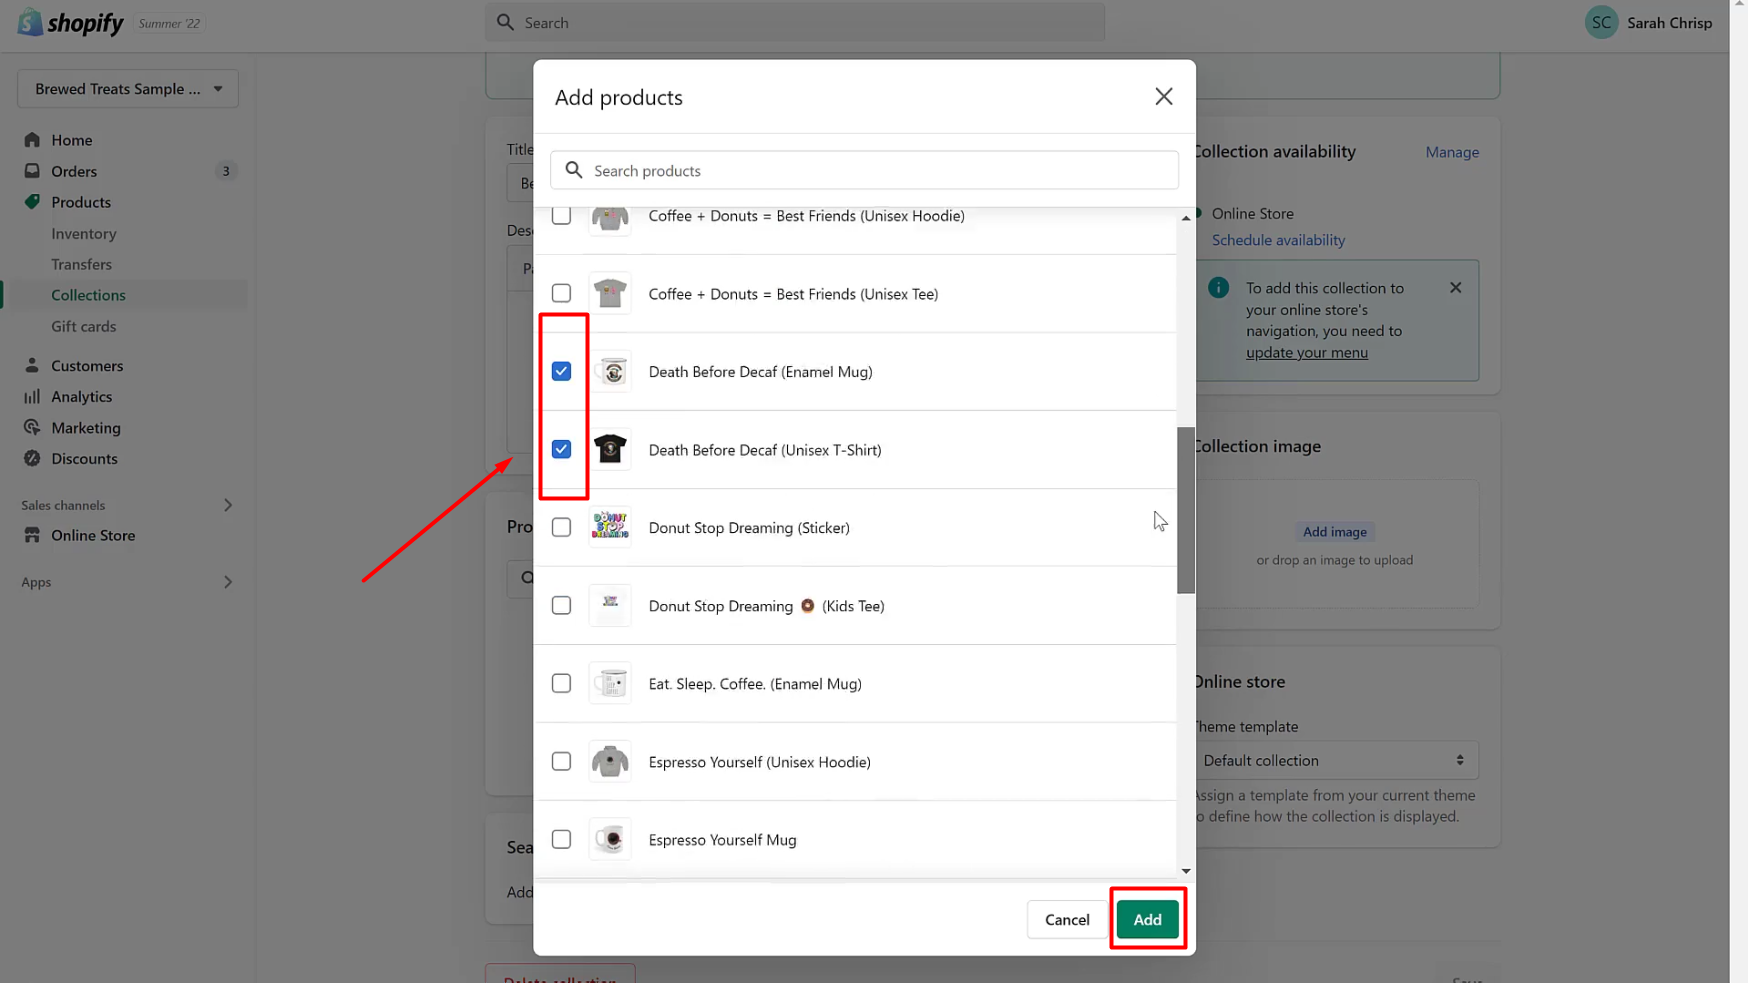
7. Scroll down then click ‘Browse’.

8. Check the products you want to add to your collection. Once you’re done selecting the products, click ‘Add’.
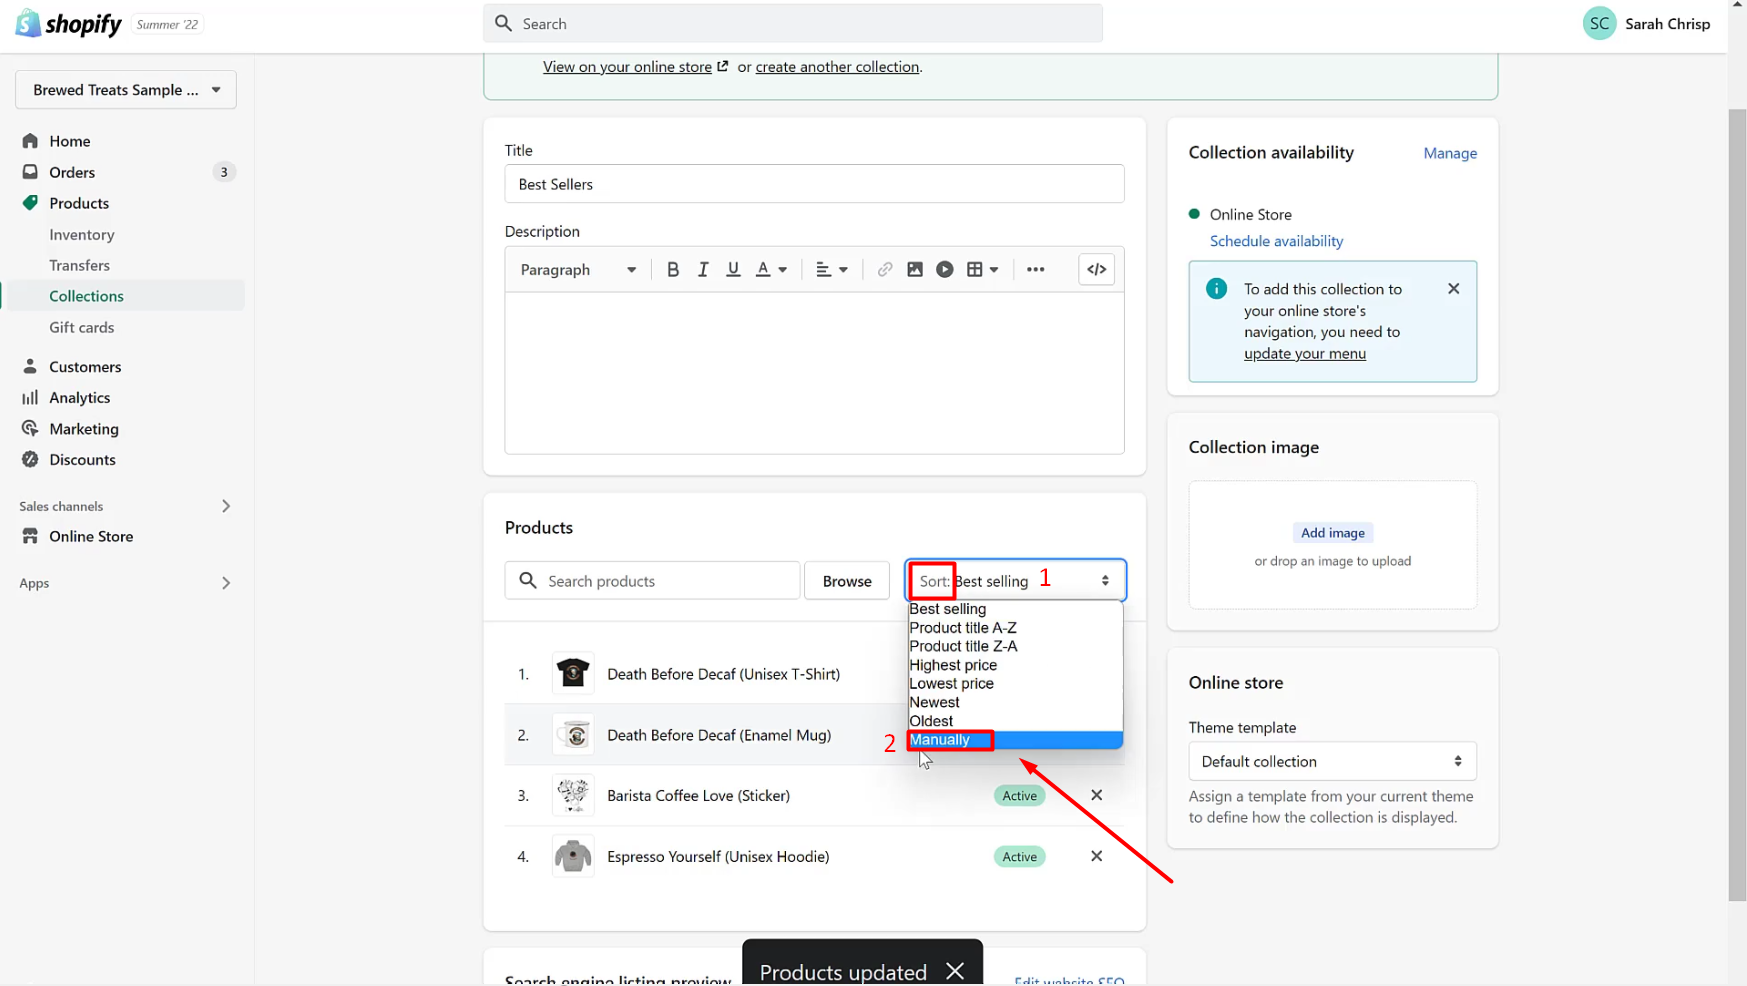
9. Click on Sort and select Manually.
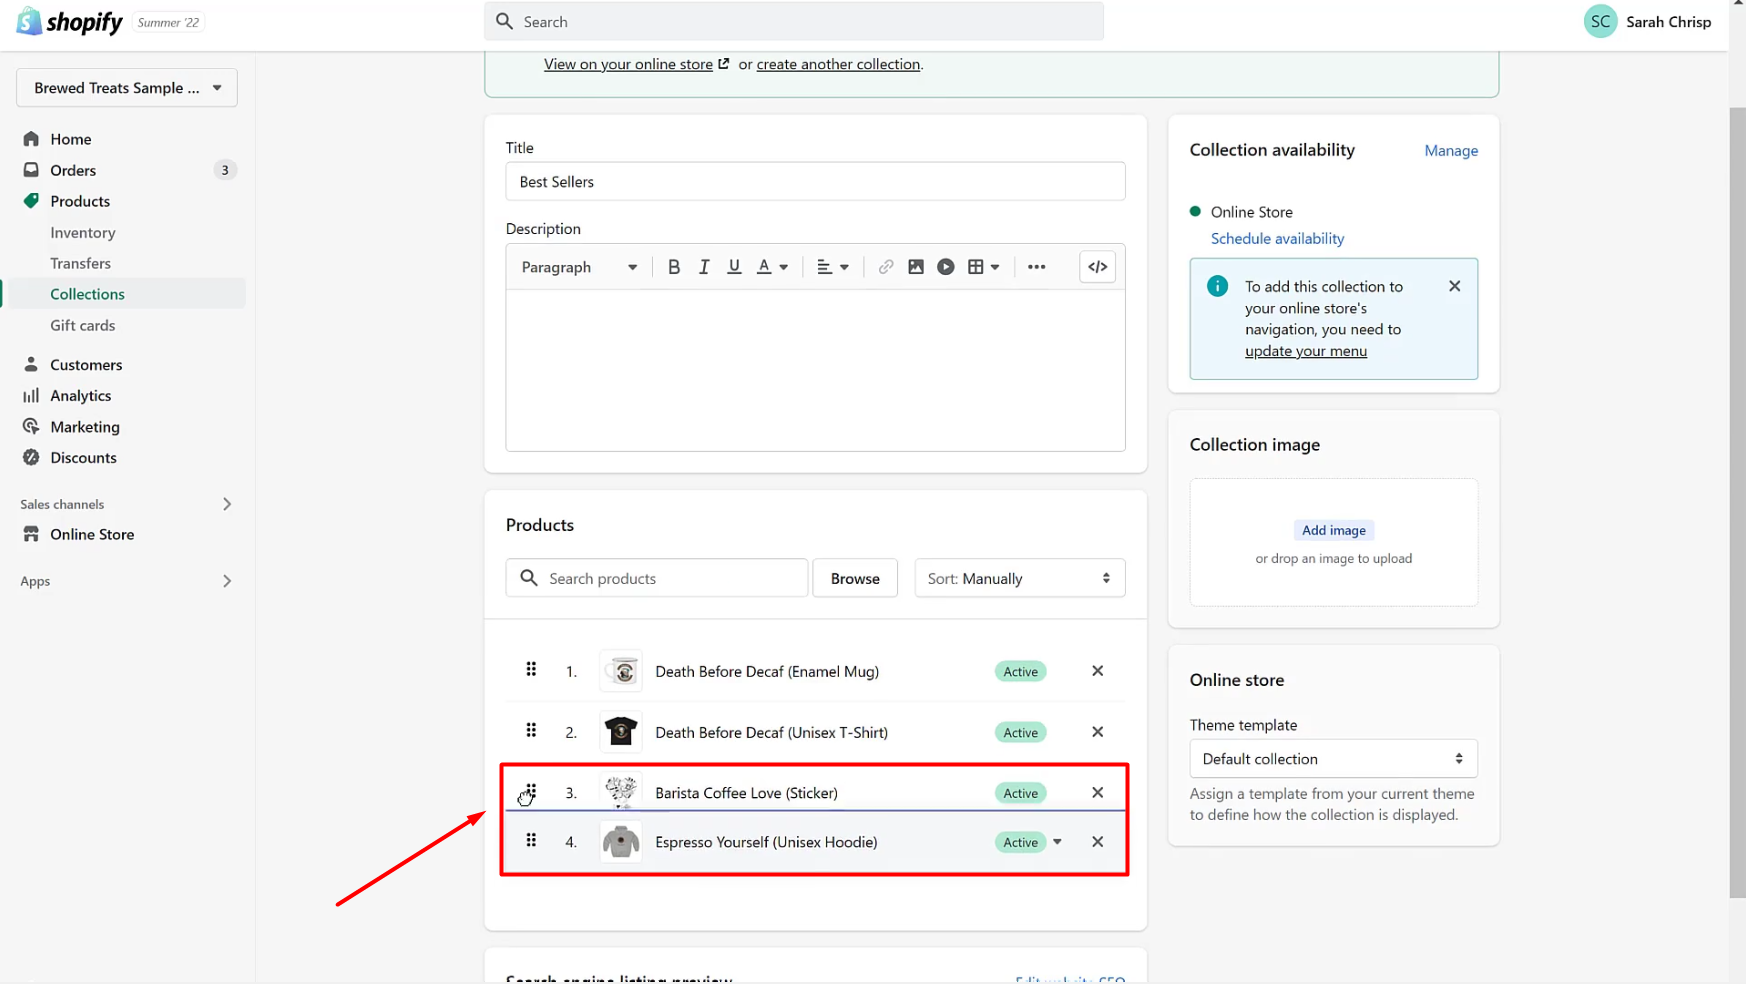
10. Drag the products to arrange them in the order you want. It autosave and you don’t need to add a category for this one too.
11. Once done, click ‘Online Store’. Then click ‘Customize’.

12. Click on Theme Settings. Click on ‘Colors’.
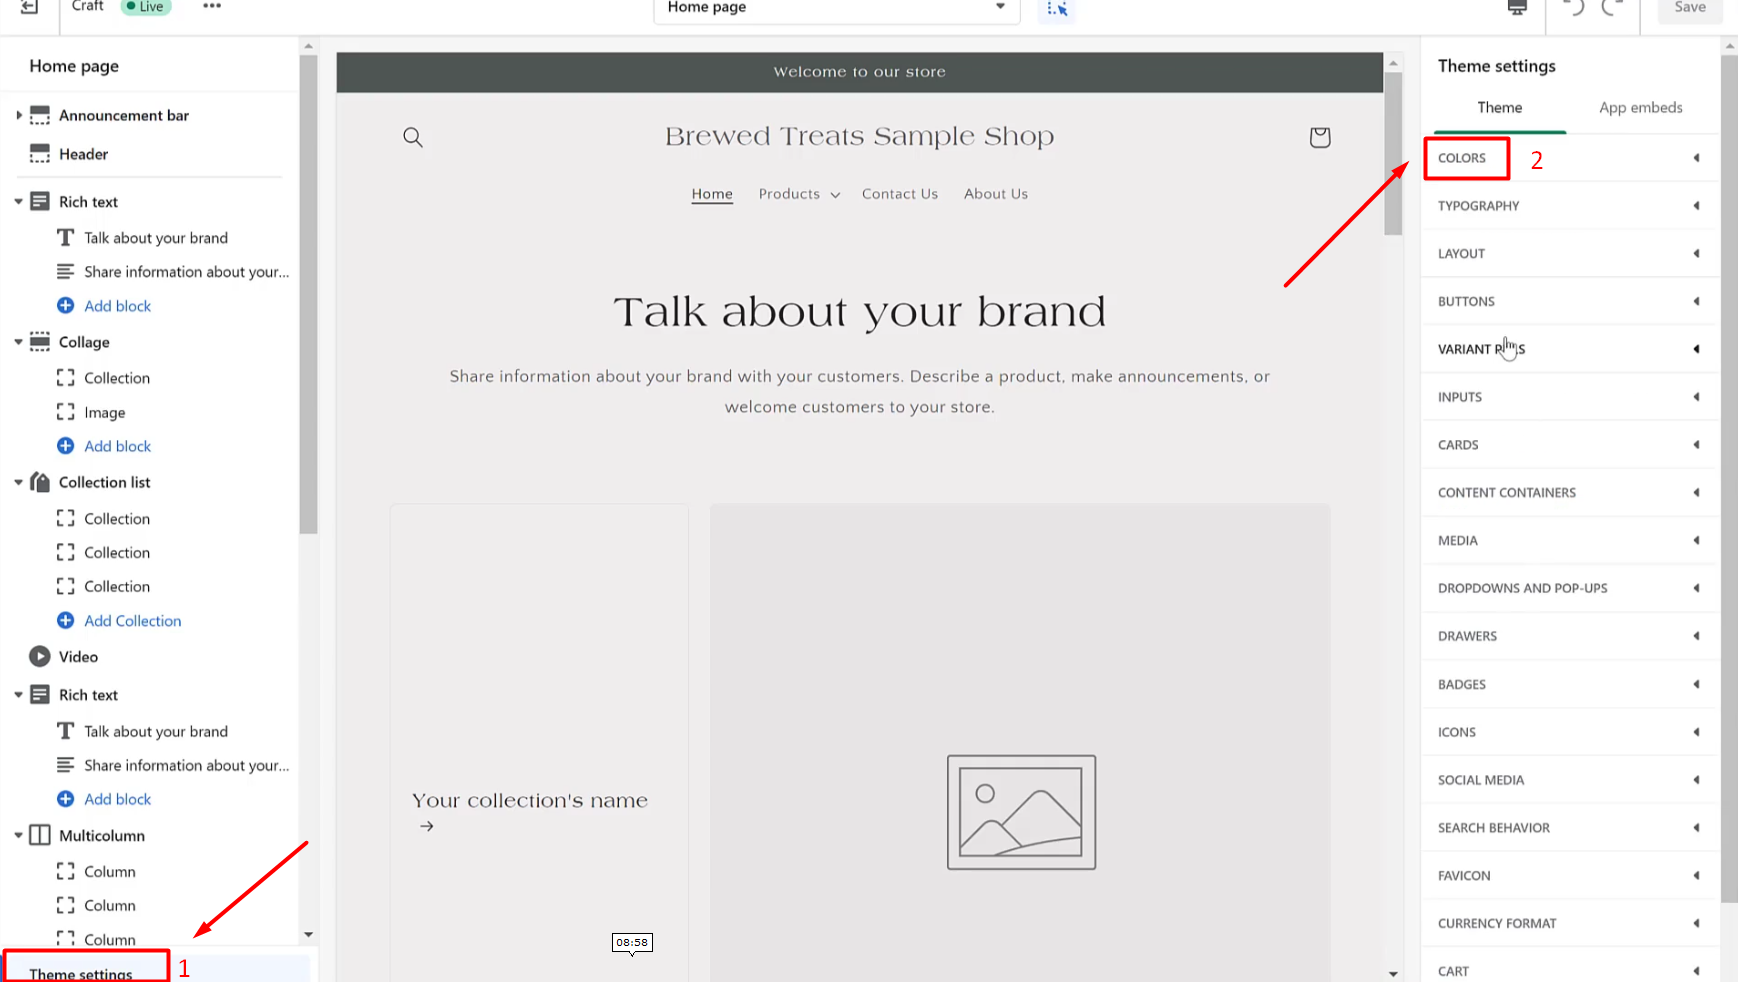
13. Let’s change the Accent colors to our desired store color by either using the color picker or pasting in the code the color we want to use. Do the same for Accent color #2. Click Save.

14. Now select a font for the store by going back and clicking on Typography.
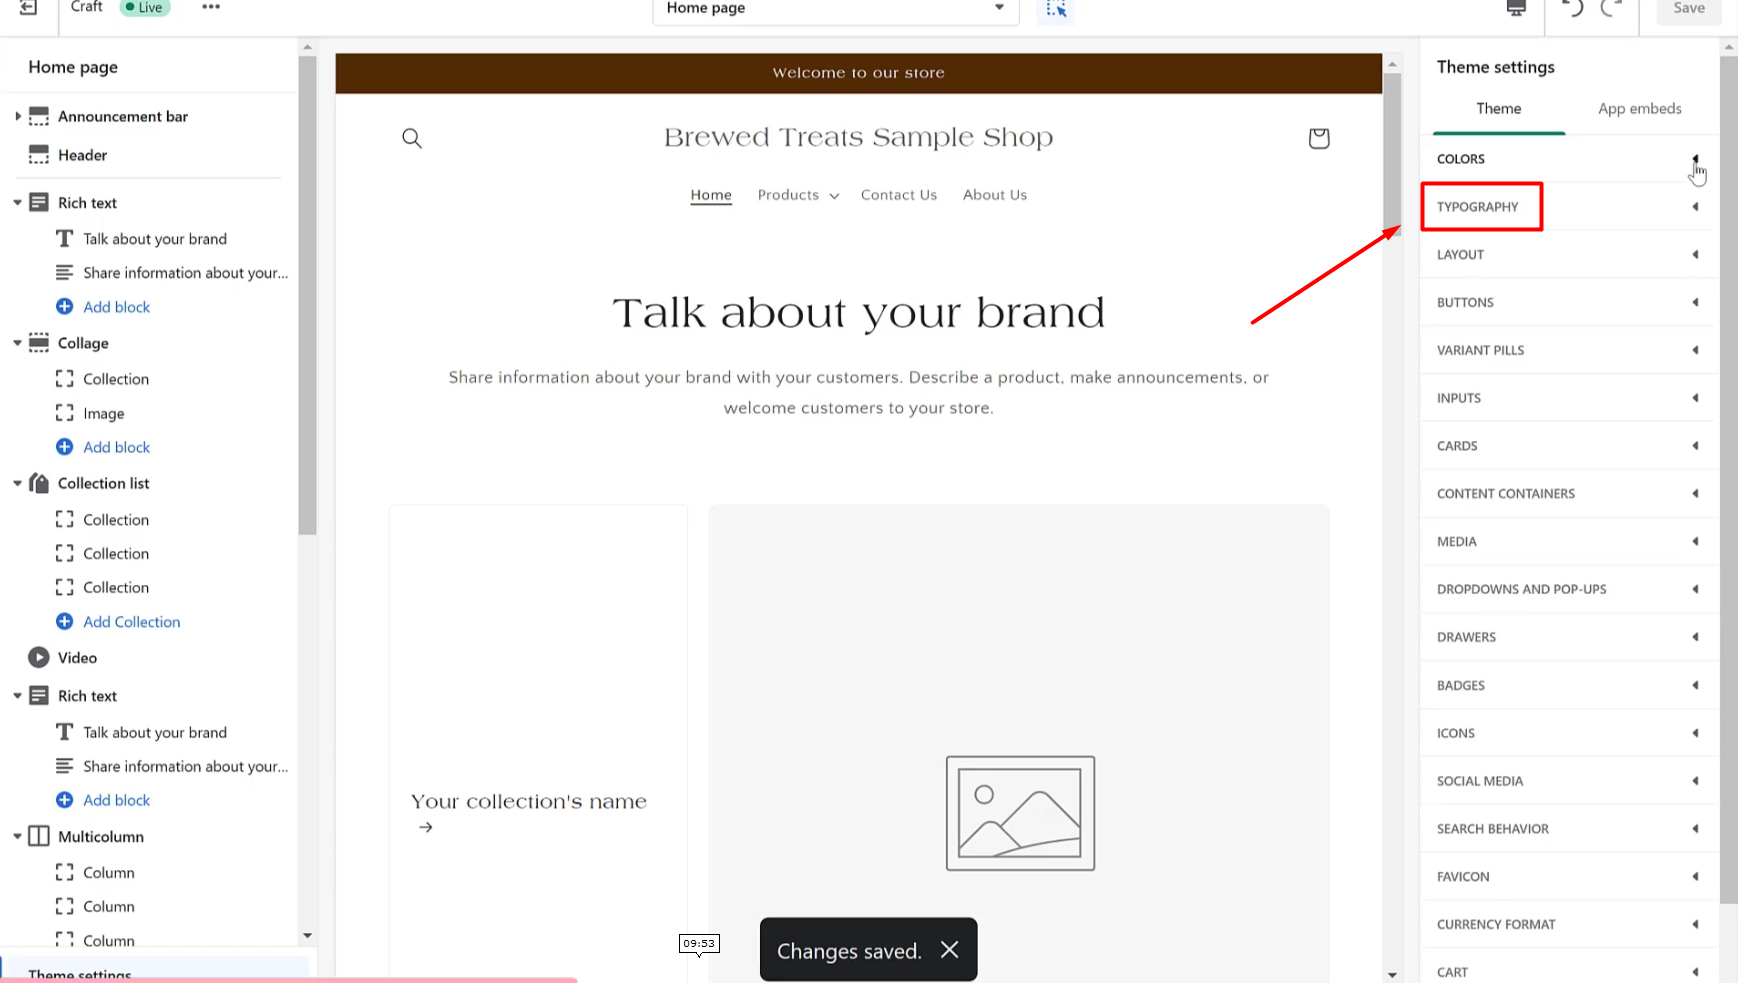
15. Click on the font you want to use for your store and click ‘Select’.
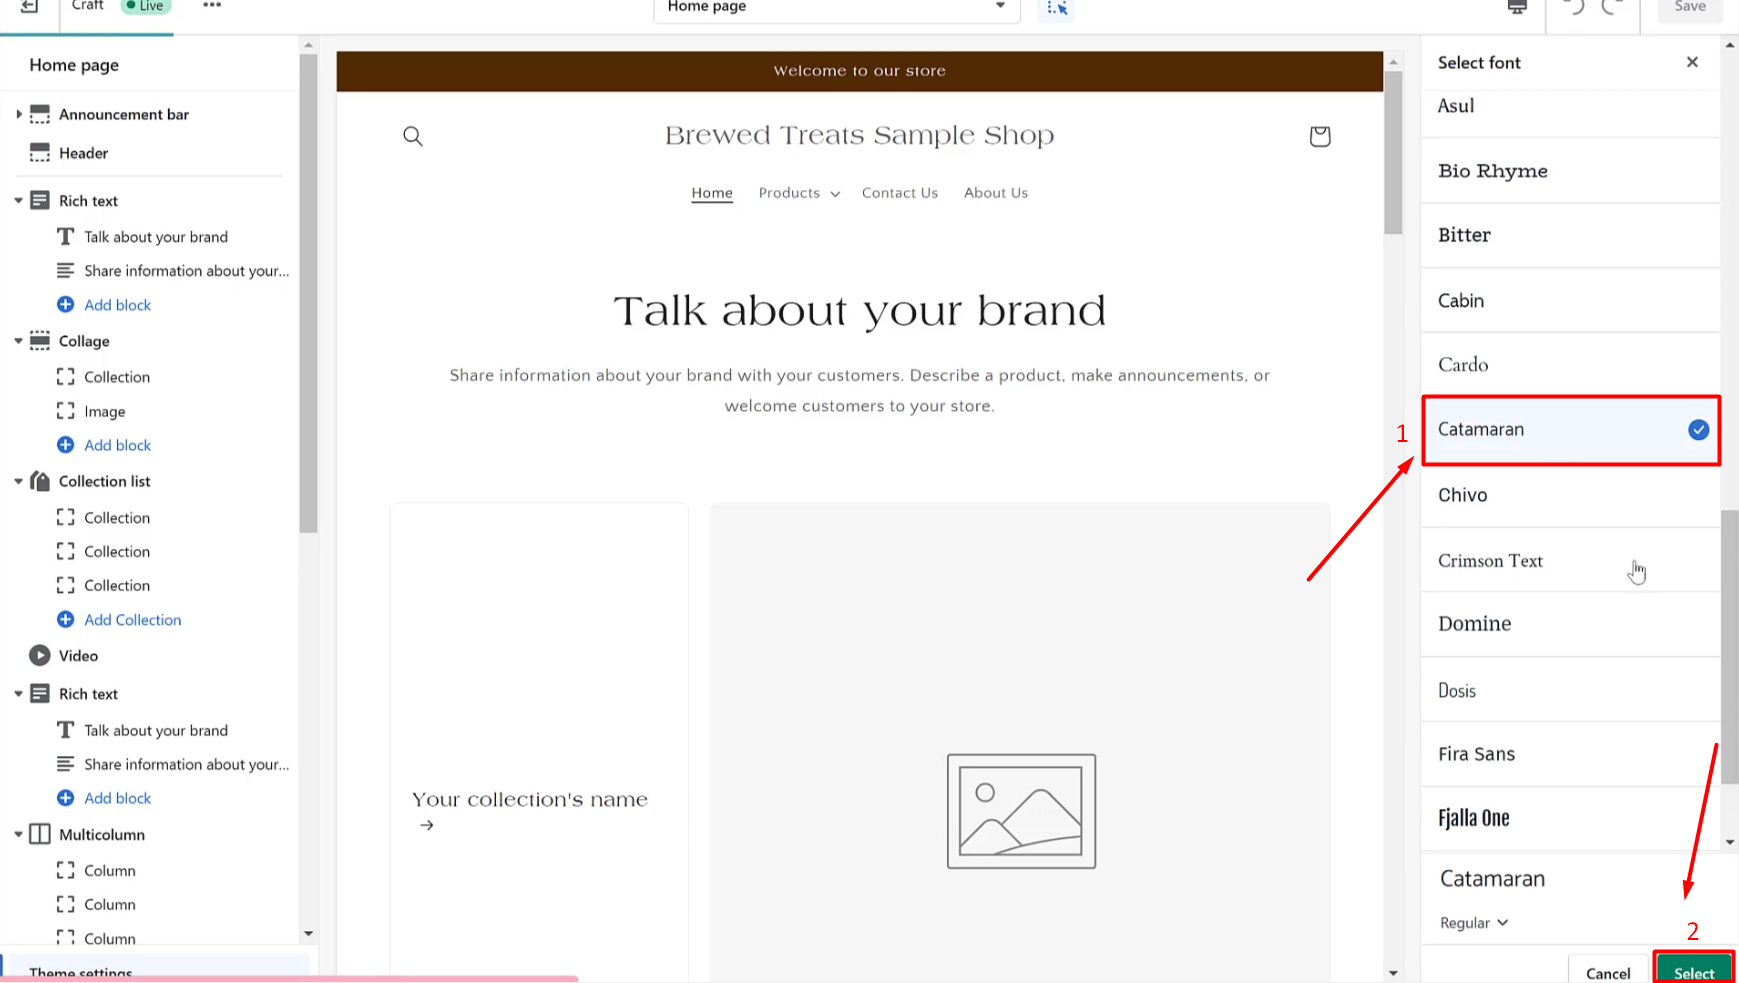
16. Click on Body text and do select the same font we have chosen earlier and click ‘Save’.

17. Close the Typography tab and click on the Layout tab. Change the Page width to 1000 pixels. Click ‘Save.
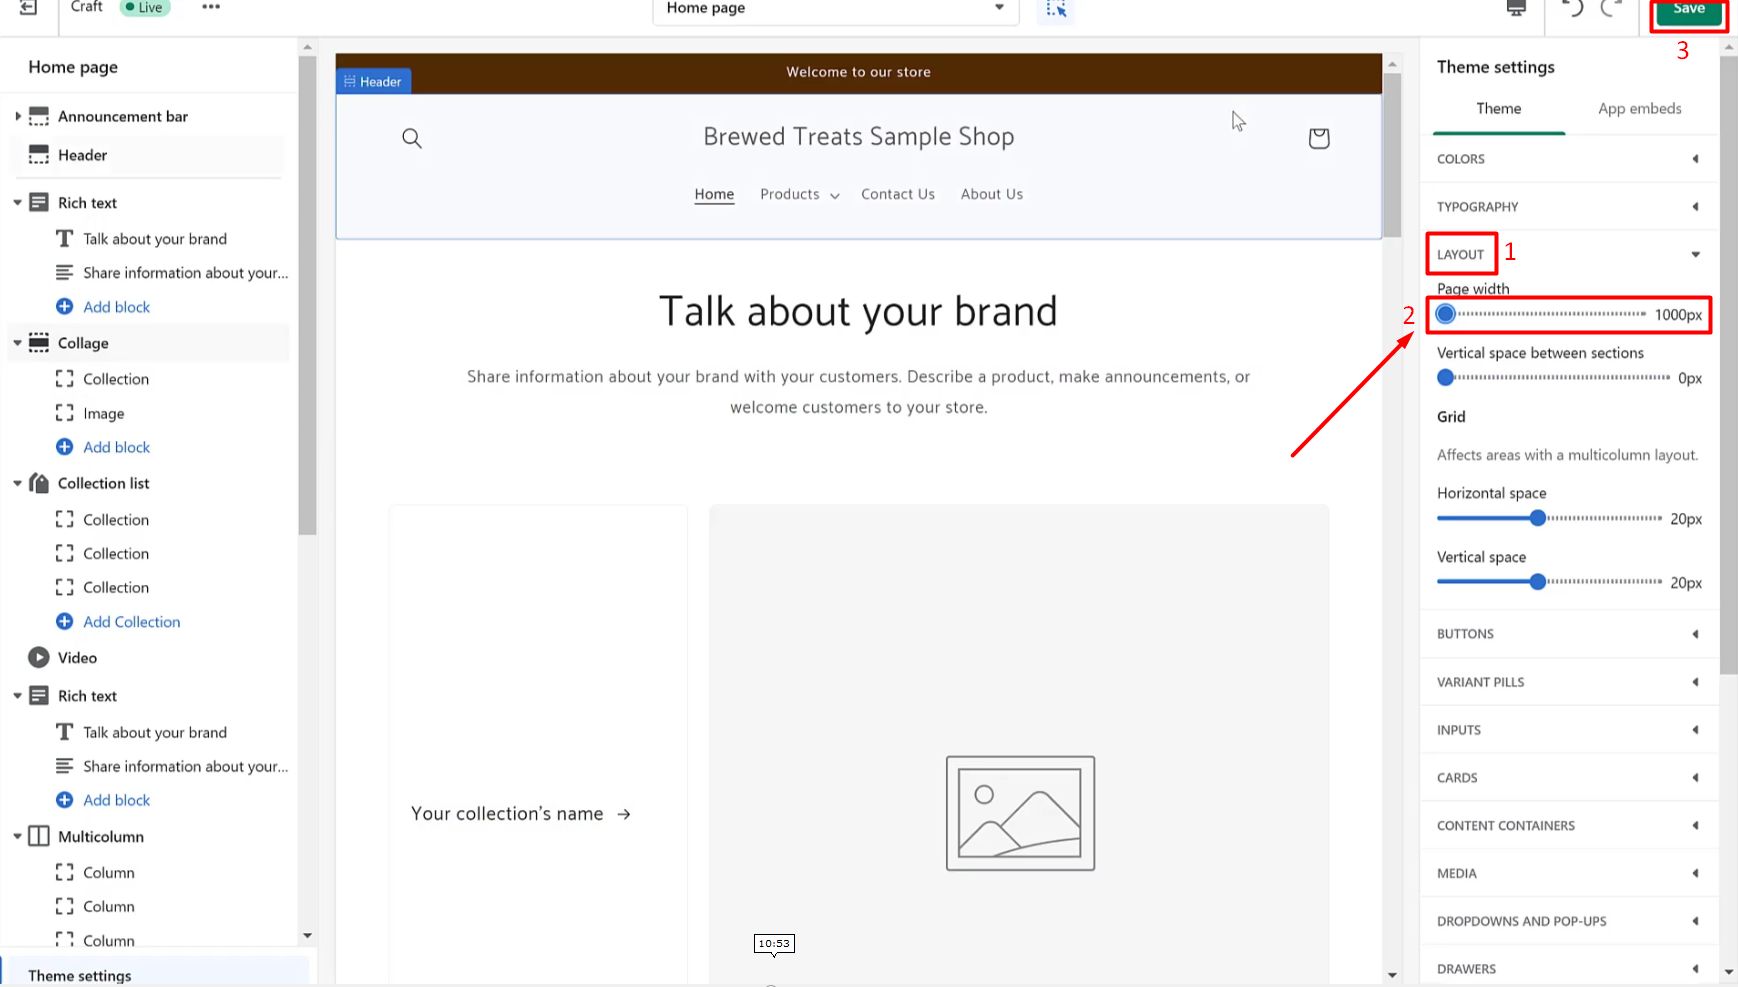
We have the option to edit even the smallest details of our store like how we want the buttons to look by adjusting the corner radius inside the Buttons tab but for now, we’re going to leave everything as is.
18. Let’s proceed to Social Media. Type in the URL of the social media accounts you want to connect to your store. Once you have added them in, click on ‘Save’.

19. Next, open the Favicon tab. Now click ‘Select Image’.

20. Click ‘Upload’. Select the favicon image that you want to use. Click ‘Open’.
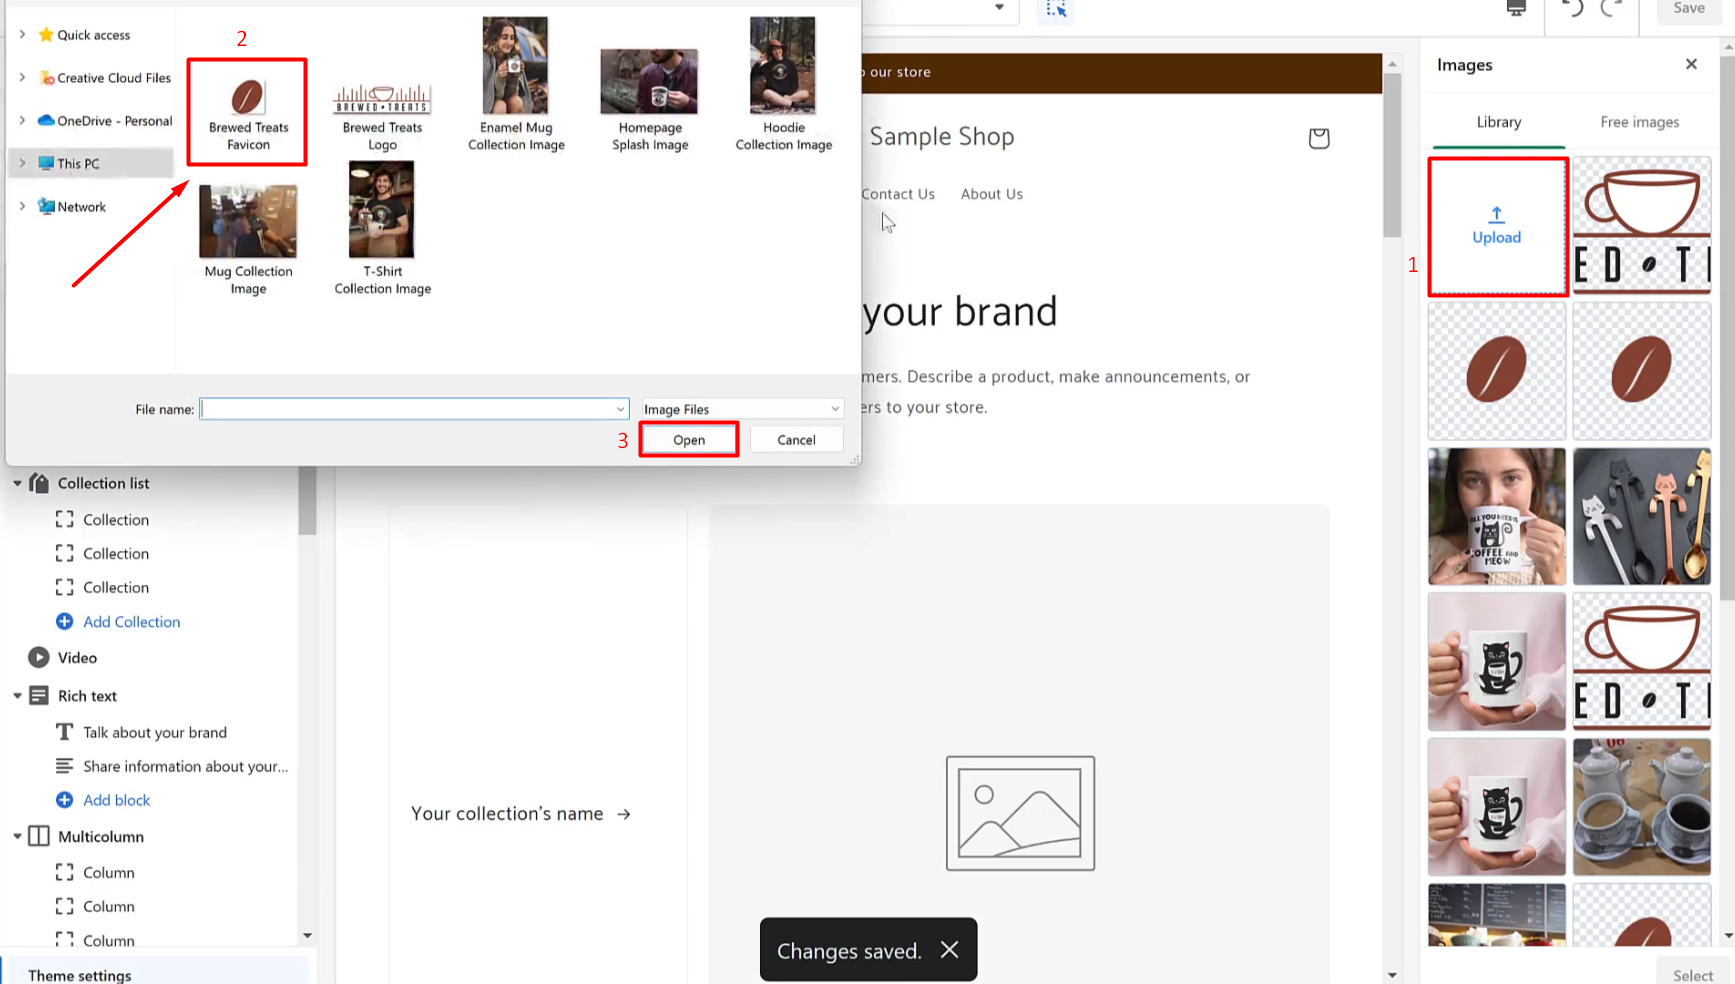
21. Select the image you uploaded and click ‘Select’. Then click ‘Save’.

22. Next, open the Checkout tab. Now click ‘Select Image’ under Logo.

23. Click ‘Upload’. Select the logo image that you want to use. Click ‘Open’.

24. Select the image you uploaded and click ‘Select’.
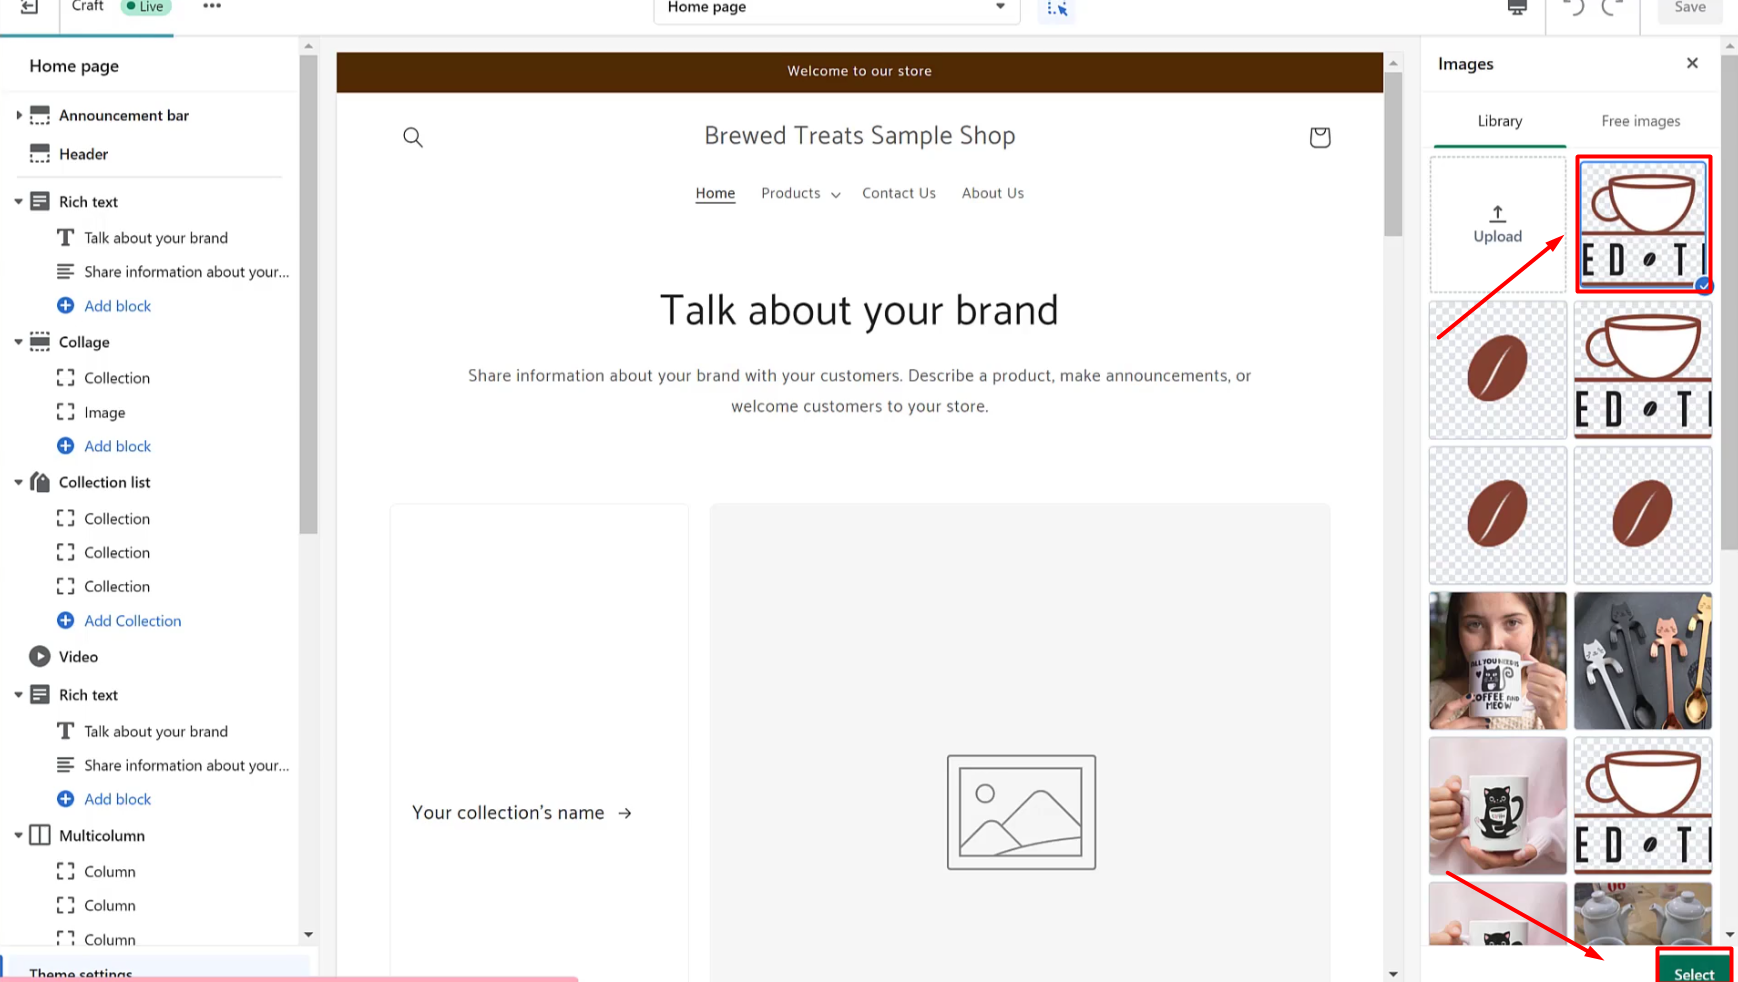
25. Next, go to Logo Size and select Large.

26. Then go to Colors and select the brand color for the Accents and Buttons. Then, click ‘Save’.

27. Go to Themes under Online Store, click ‘Customize.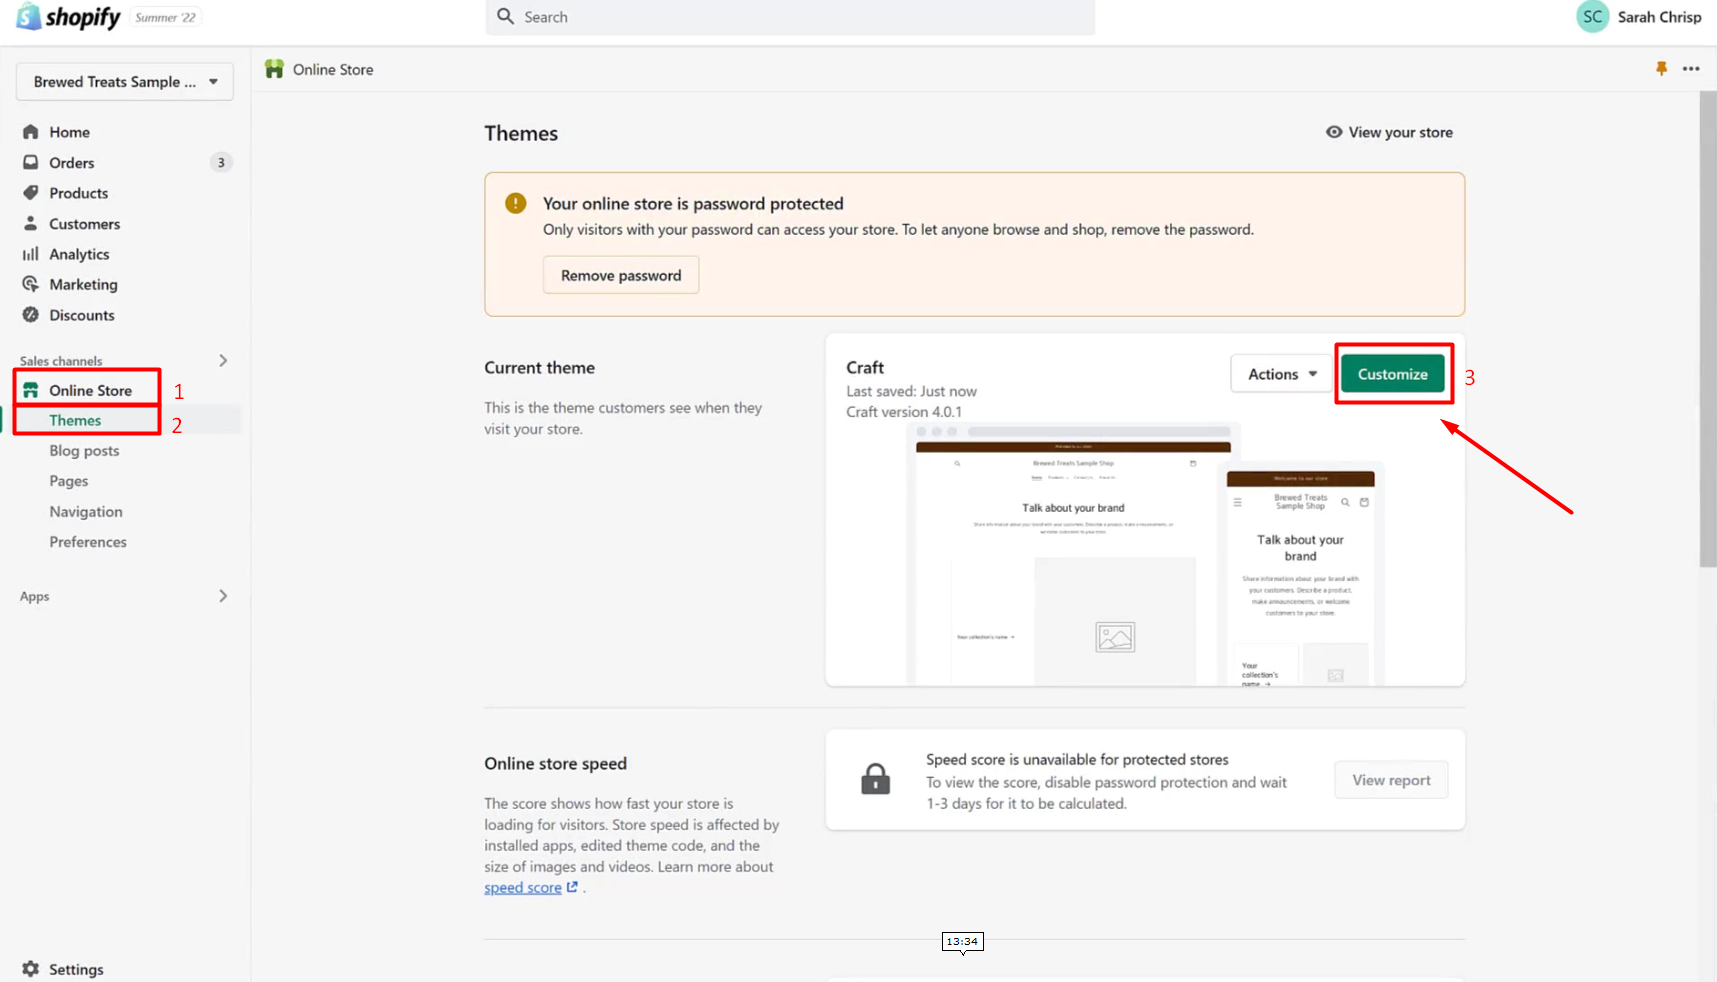
28. Go ahead and remove all other sections except from the Announcement Bar, Header, Rich Text, one Collage Section, Collection List, Email Signup and the Footer.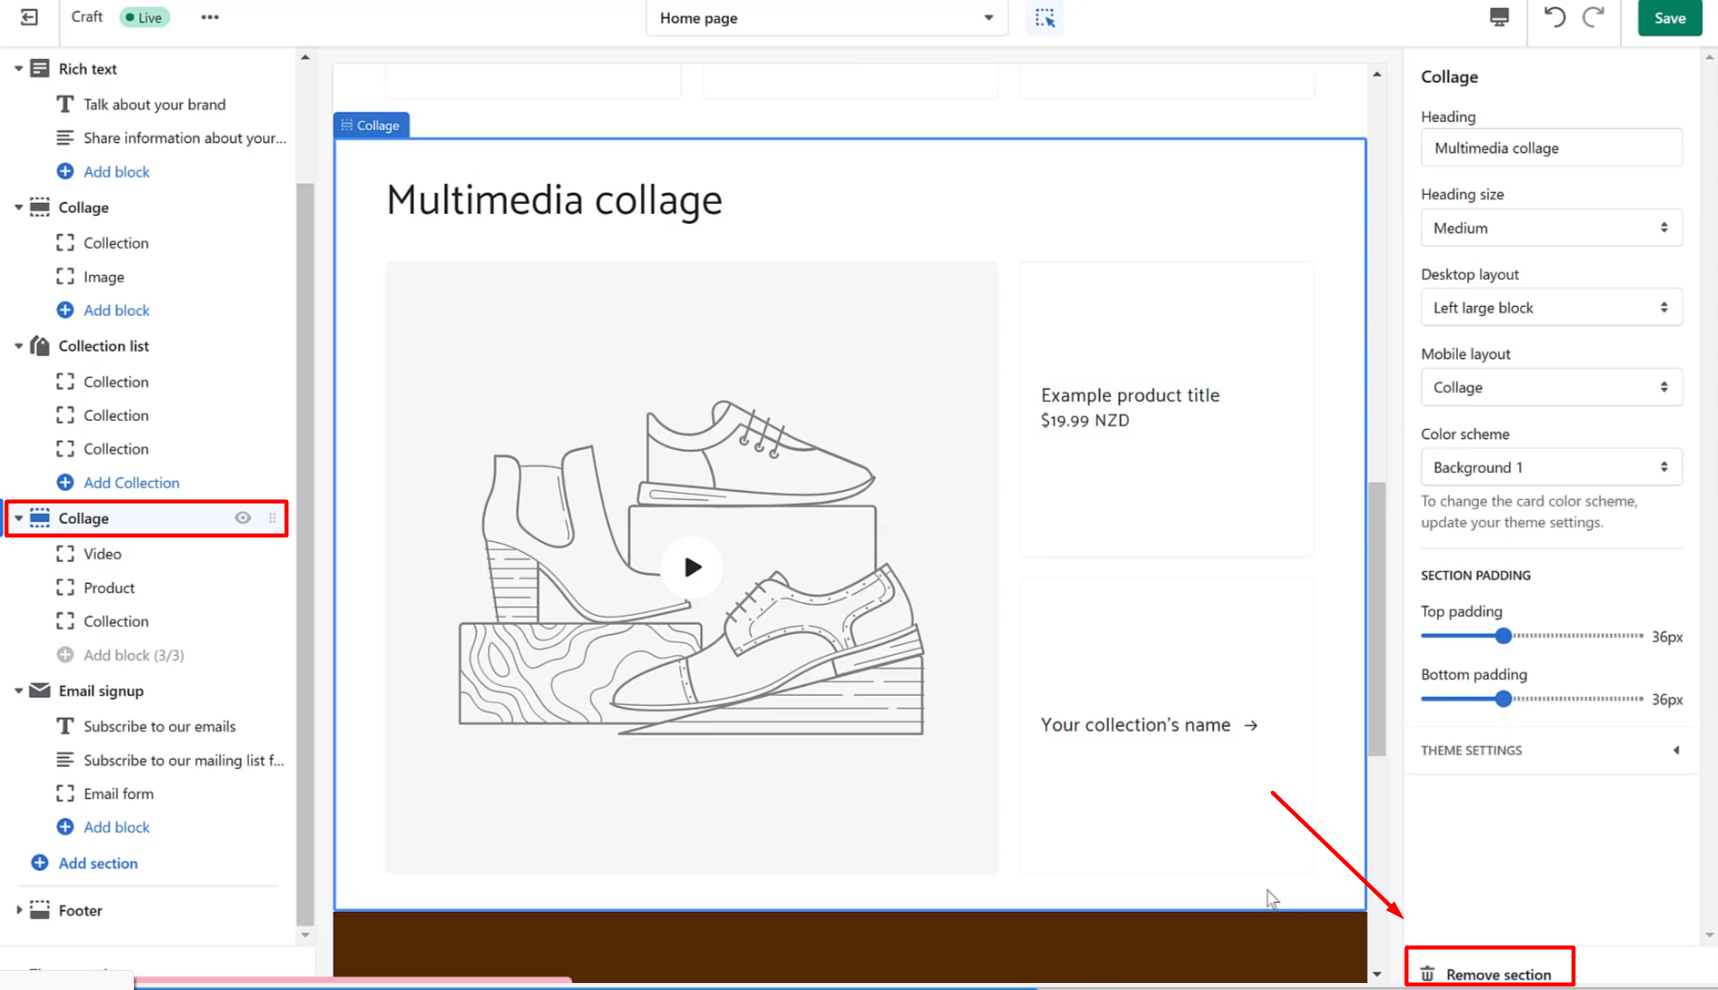
29. Click on Announcement Bar then click on the Welcome message then feel free to edit the text you want to display in there.

30. Click on ‘Header’ then click ‘Select Image’ to add the store logo.
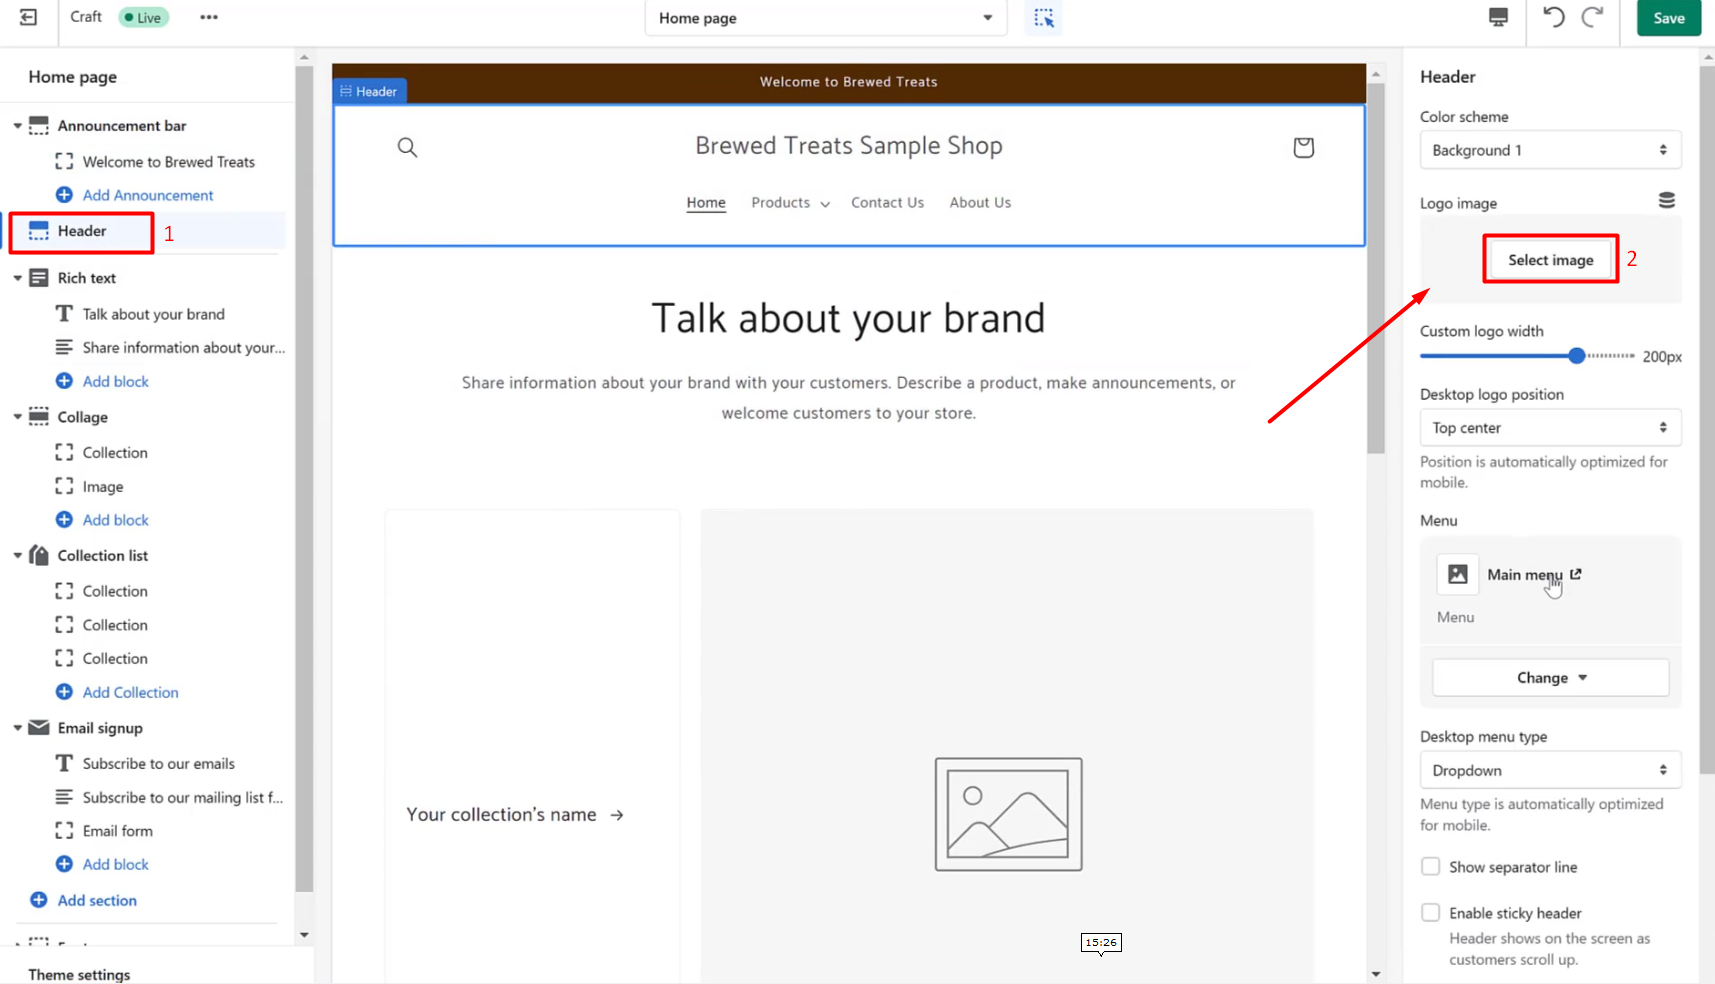
31. Click ‘Upload’. Select the brand logo that you want to use. Click ‘Open’.

32. Once it’s uploaded, click ‘Select’.
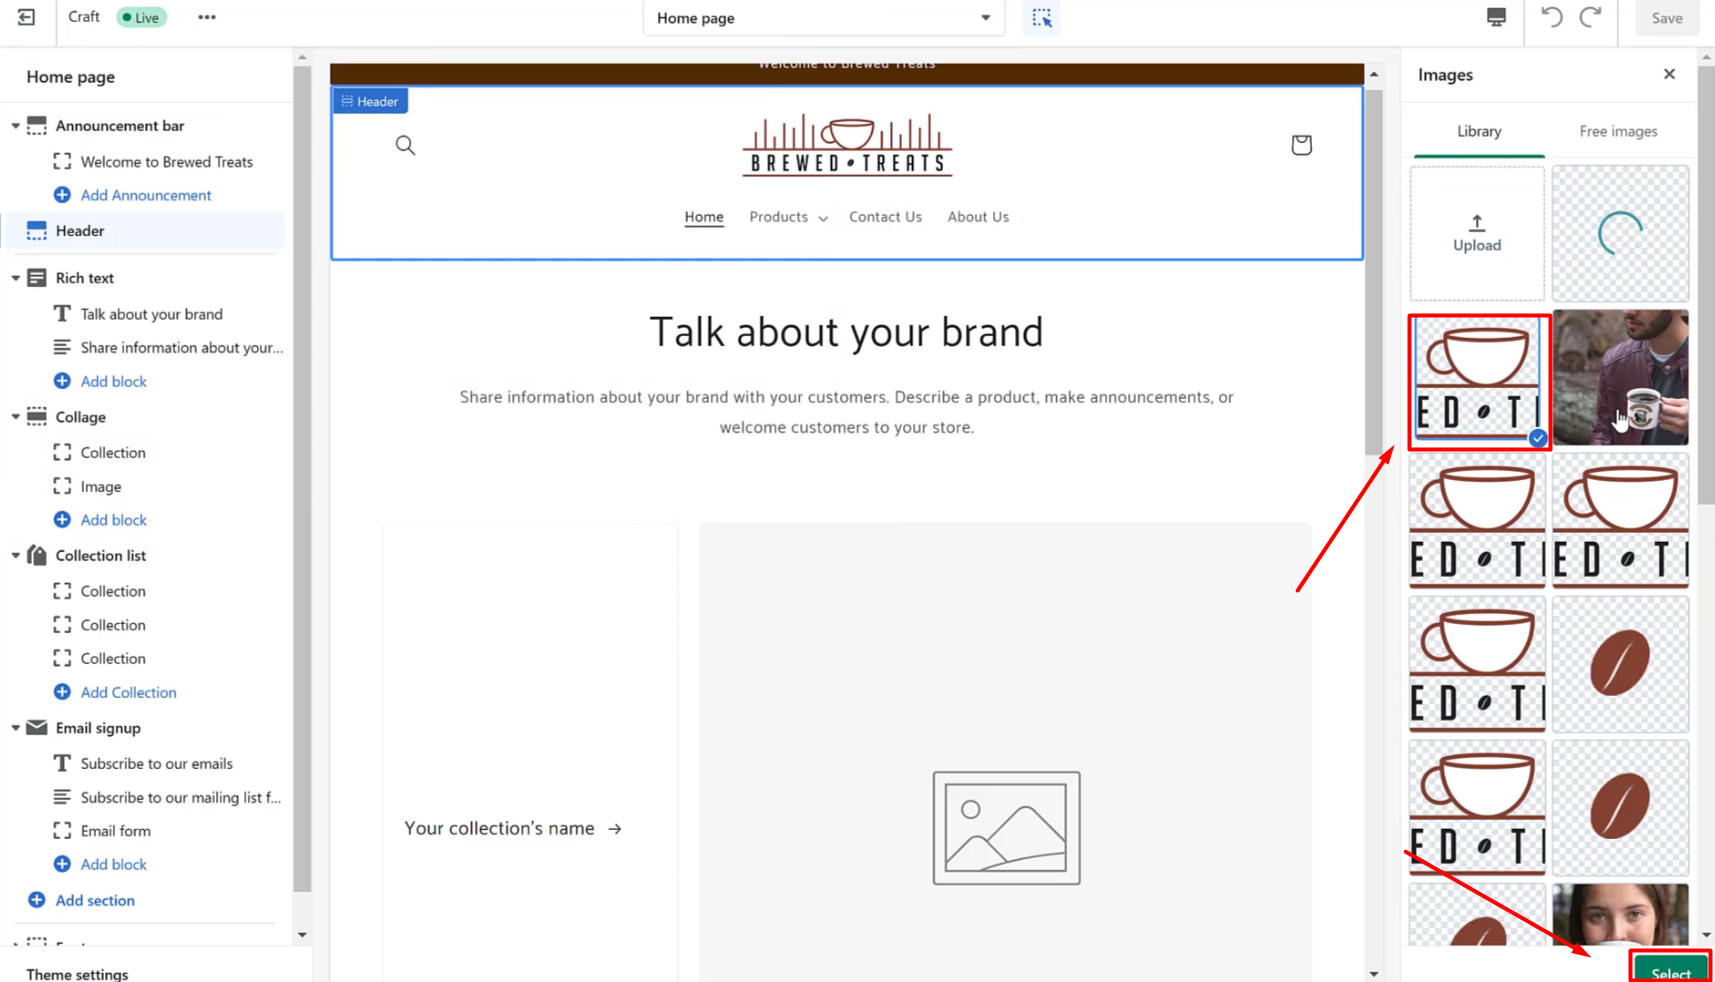
33. Adjust Custom logo width to 200 px.

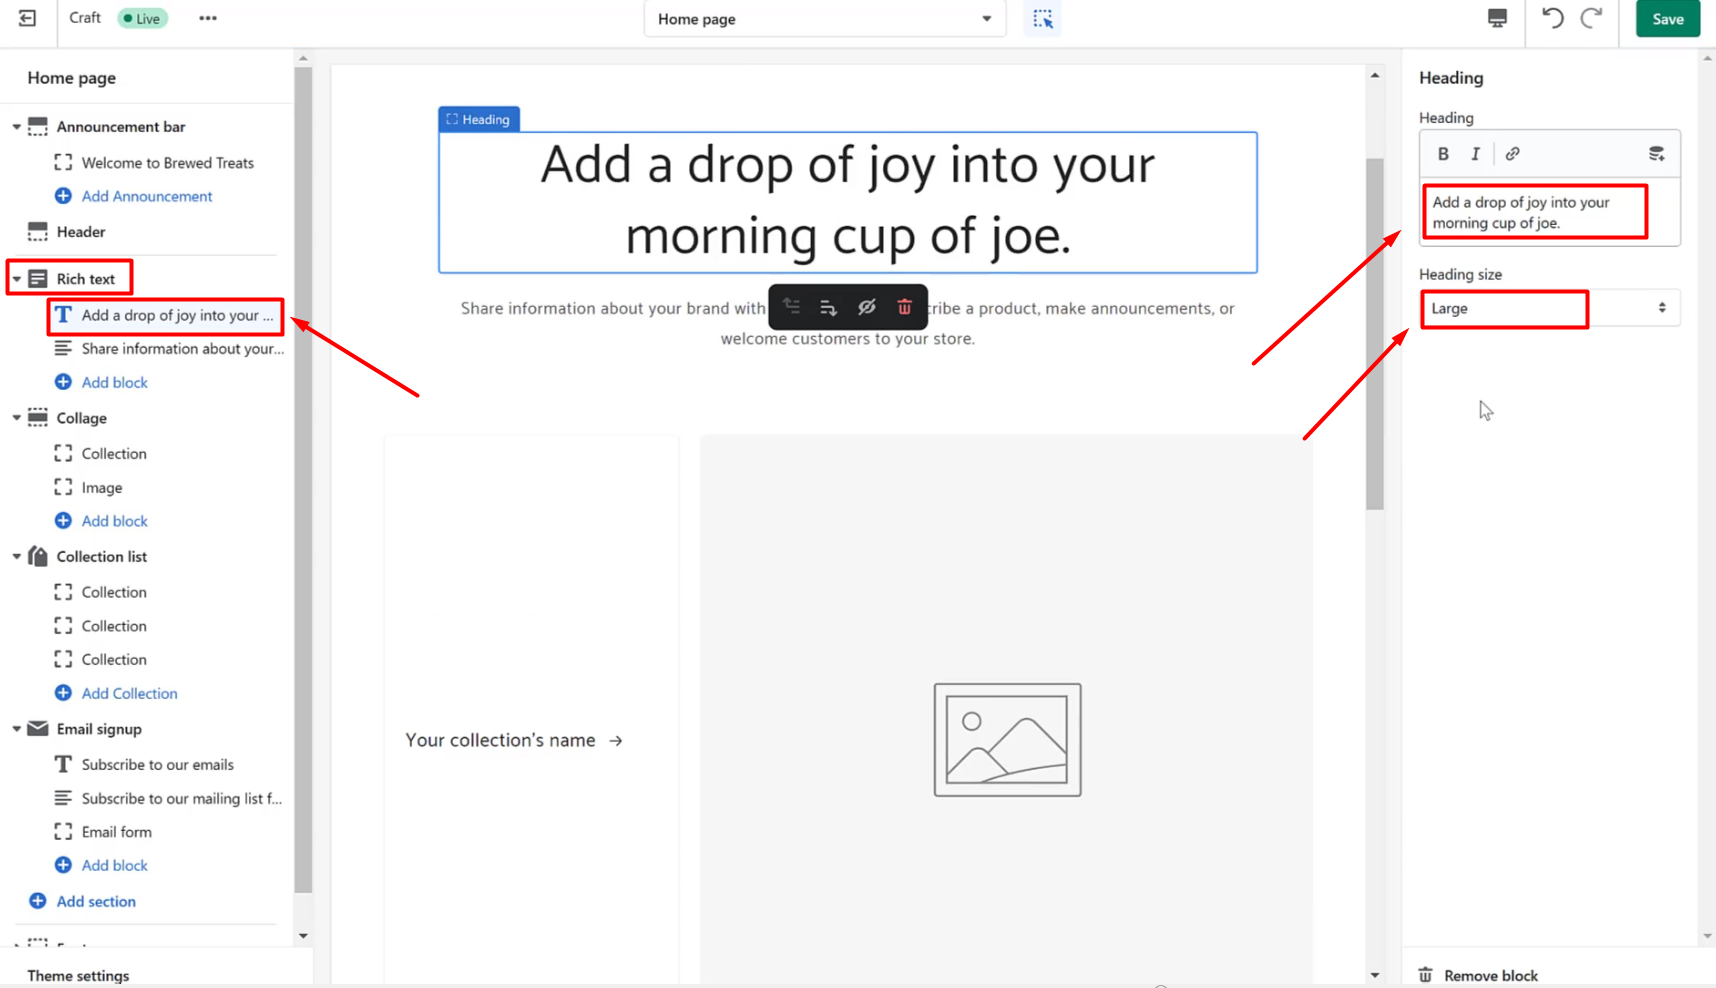
34. Click ‘Rich Text’. Click the Text for the title and feel free to add your own title for your store. Set the heading size to large.
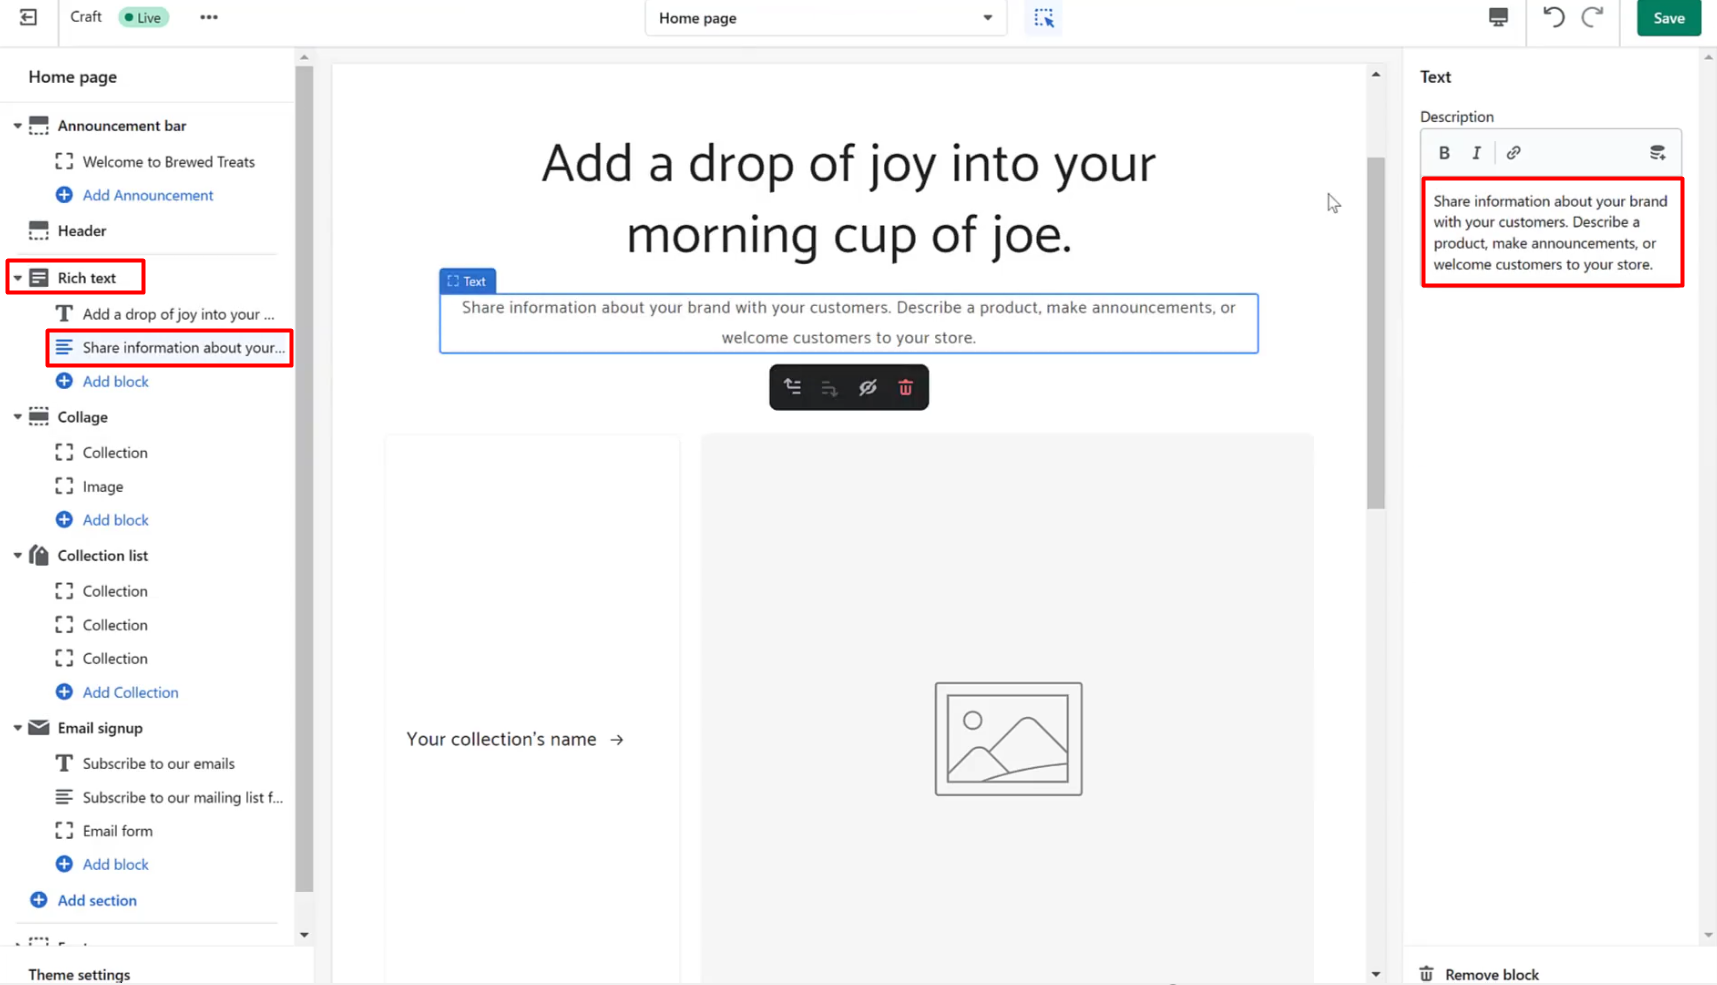
35. Still under Rich Text, click the subtitle portion and add the subtitle you want to show in your online store homepage.
36. Click ‘Collage’. Then click collection. Next, select collection.

37. Click a collection on the list then click ‘Select.

38. Next, click this space for the image then click ‘Change’. Click on ‘Select Image’.
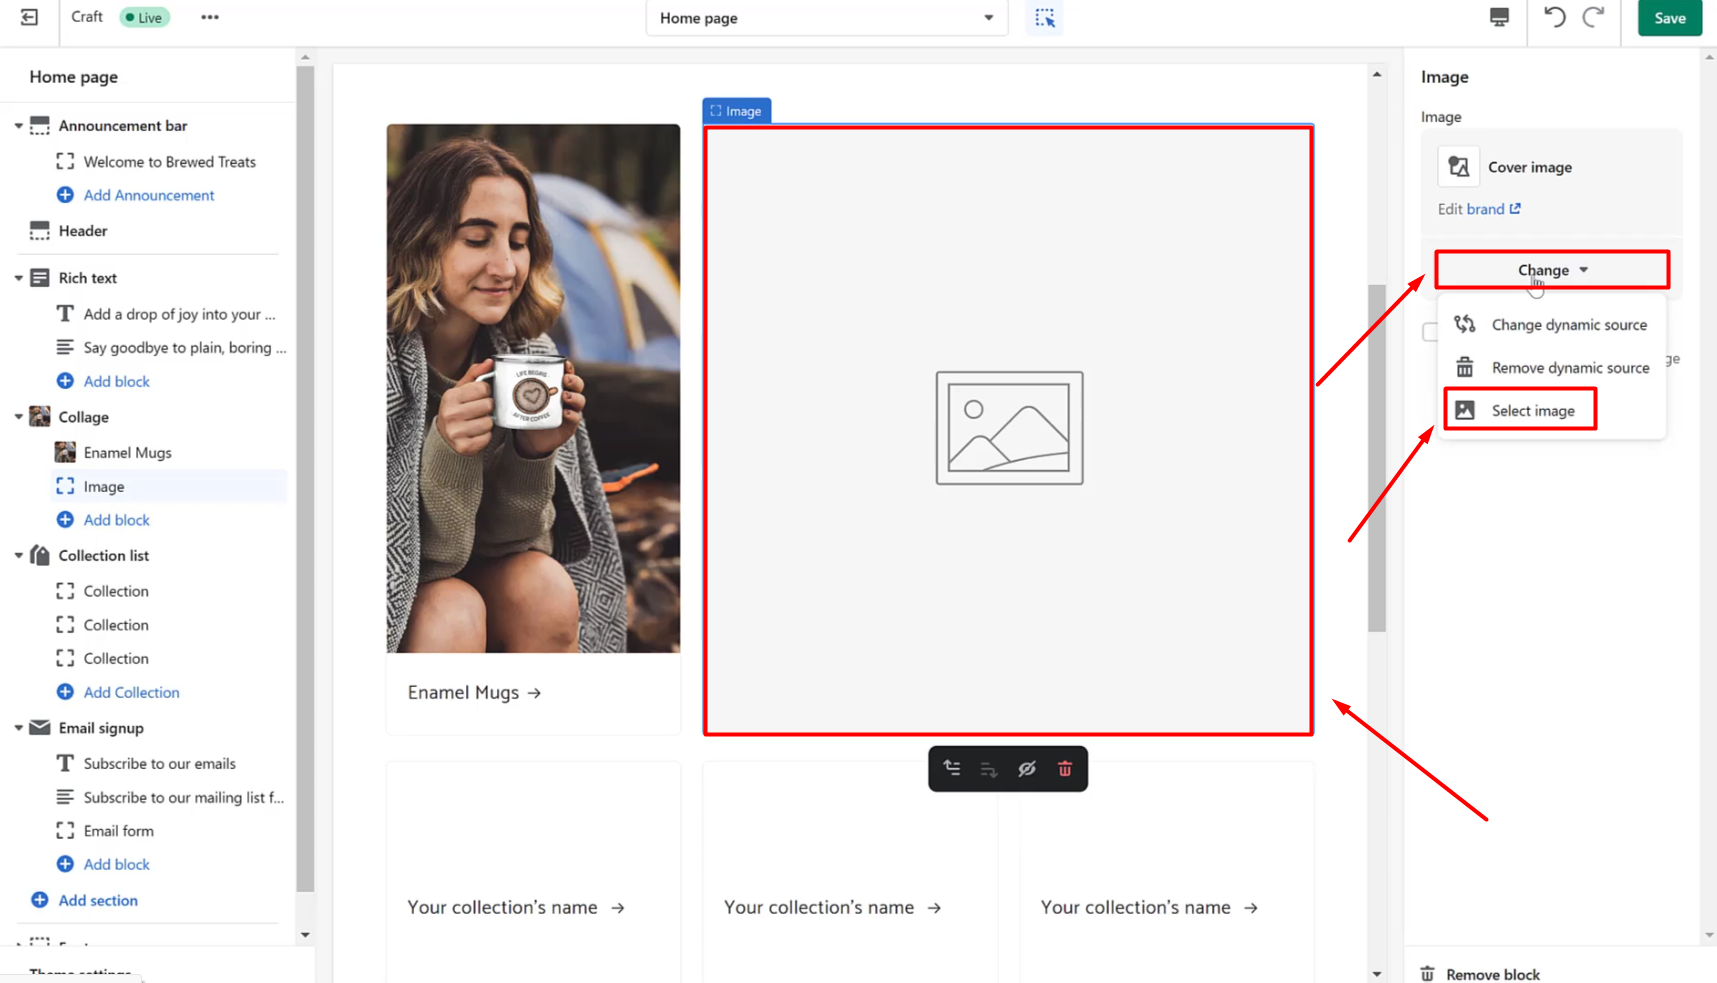
39. Click ‘Upload’. Select the homepage image that you want to use. Click ‘Open’.

40. Once it’s uploaded, click ‘Select’. Then click ‘Save’.
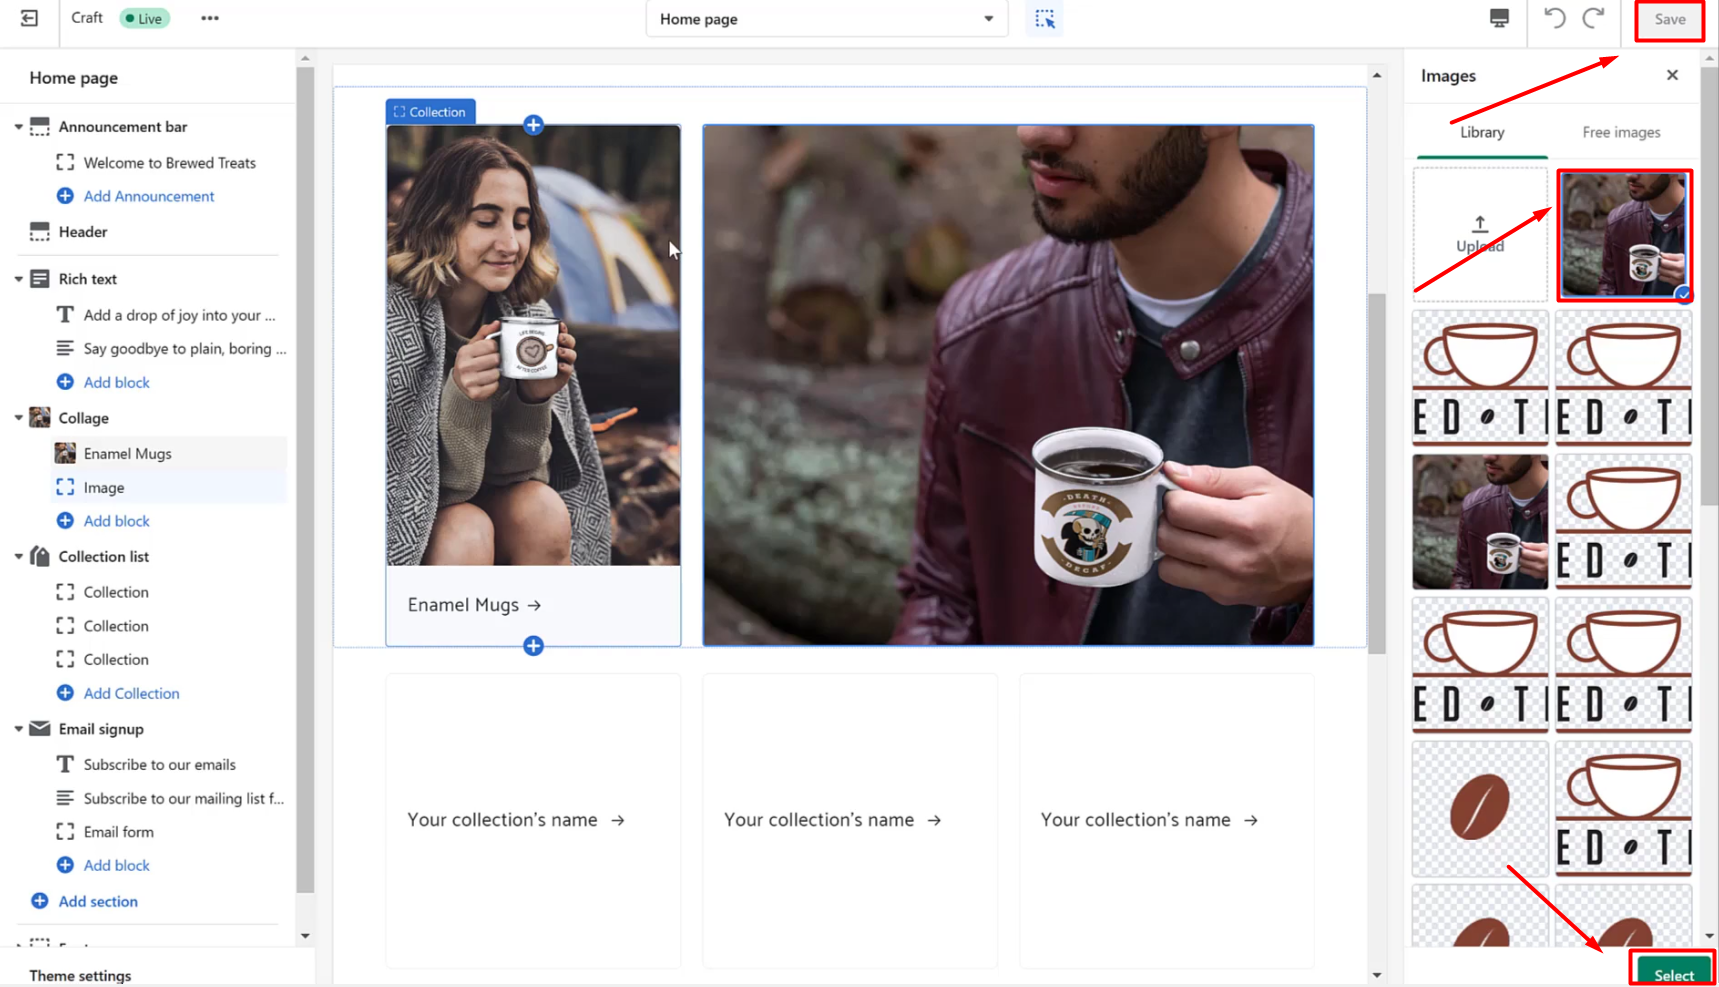
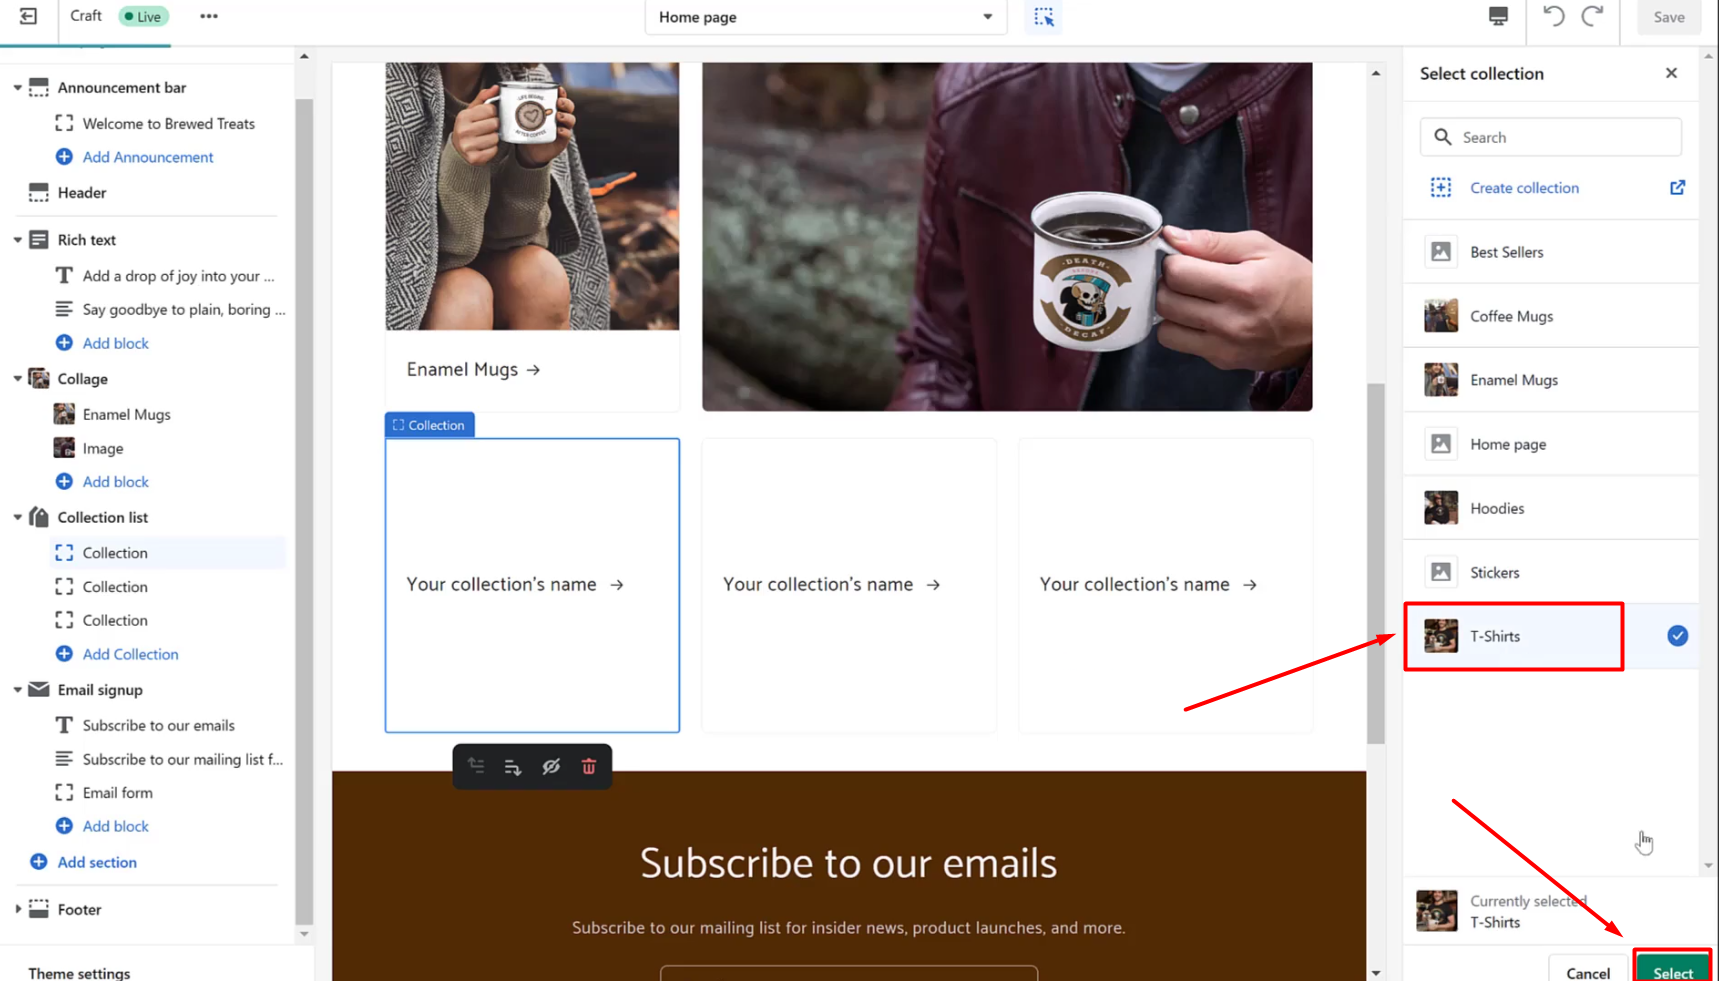
41. Now click this empty box that says ‘Your collection’s name’. The click ‘Select Collection’.

42. Select the collection you want to add to this section then click ‘Select’. Do the same for the other sections under Collections. Then click ‘Save’.
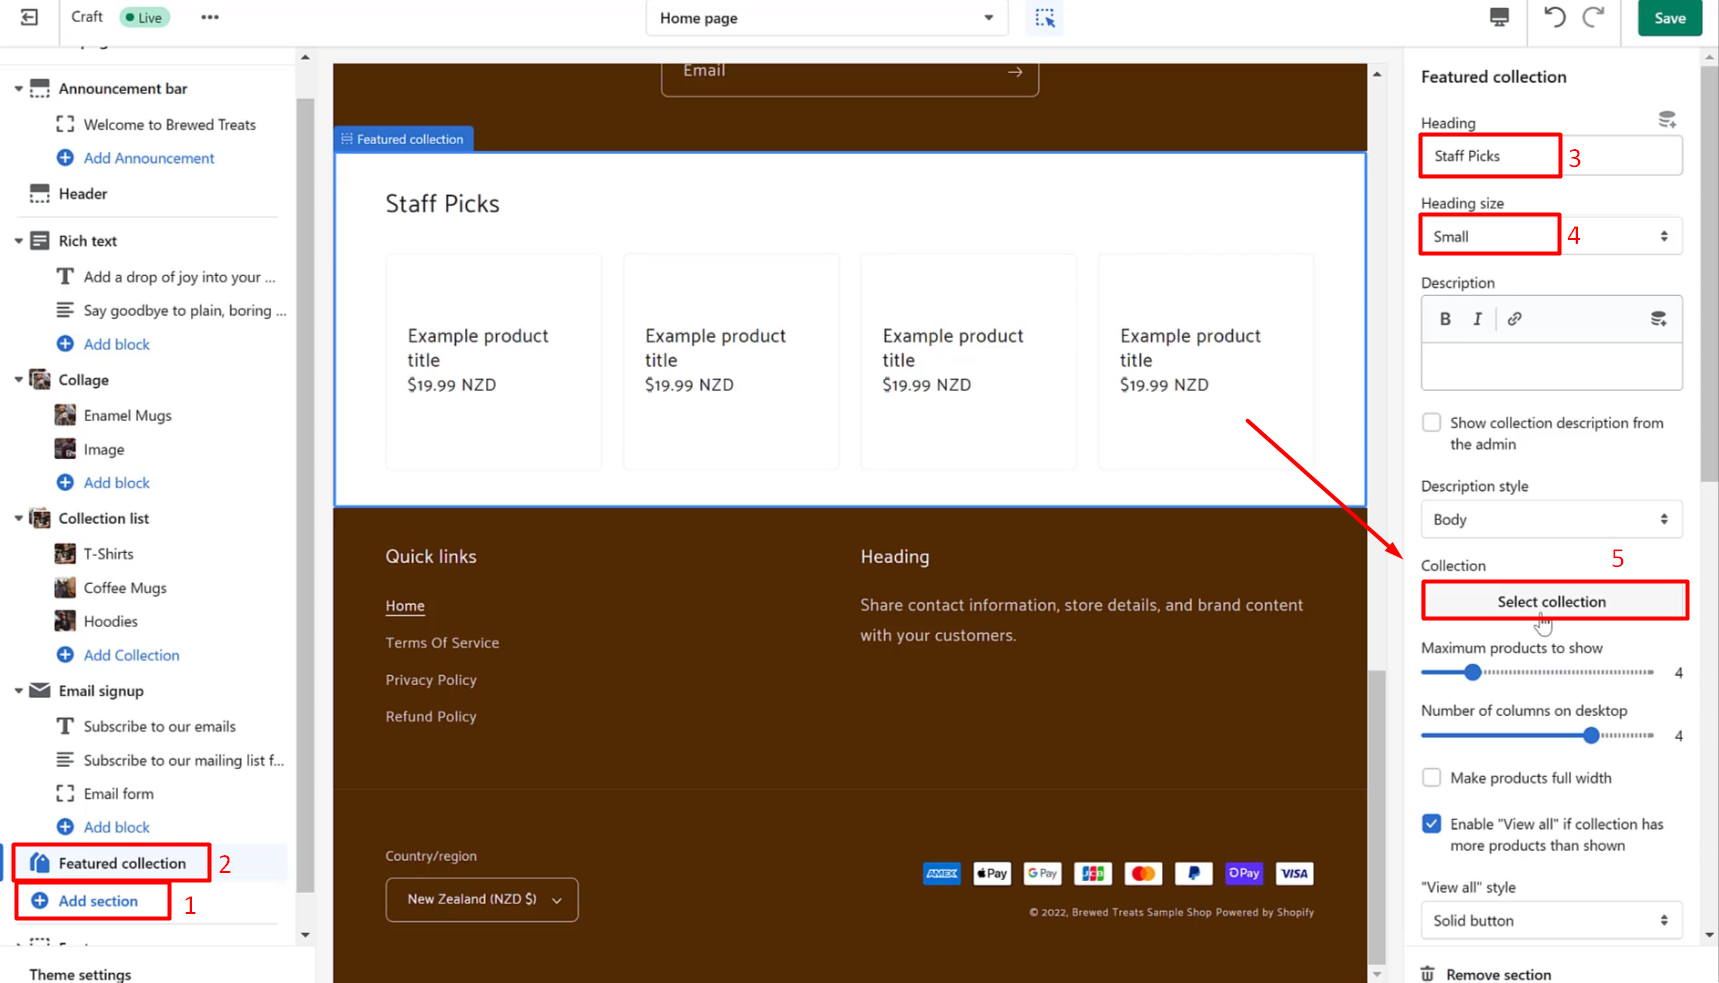
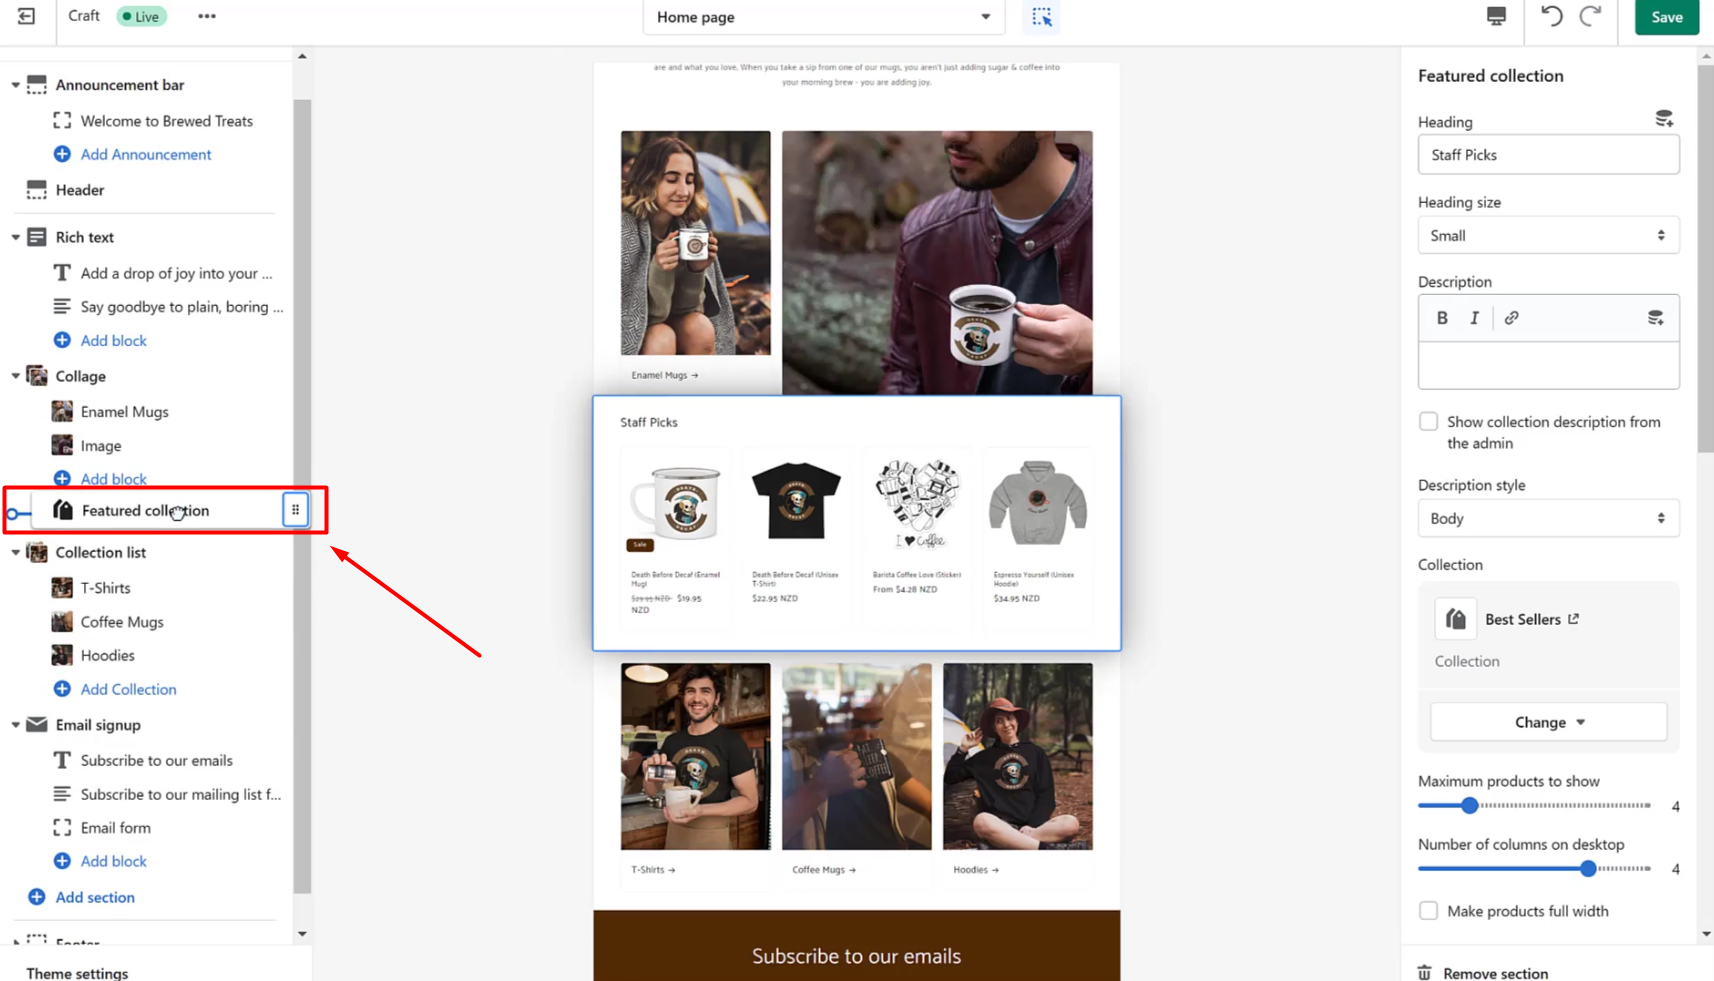
43. Click ‘Add Section’ then select ‘Featured Collection. Next, change the heading and set its size to Small. Then click ‘Select Collection’.
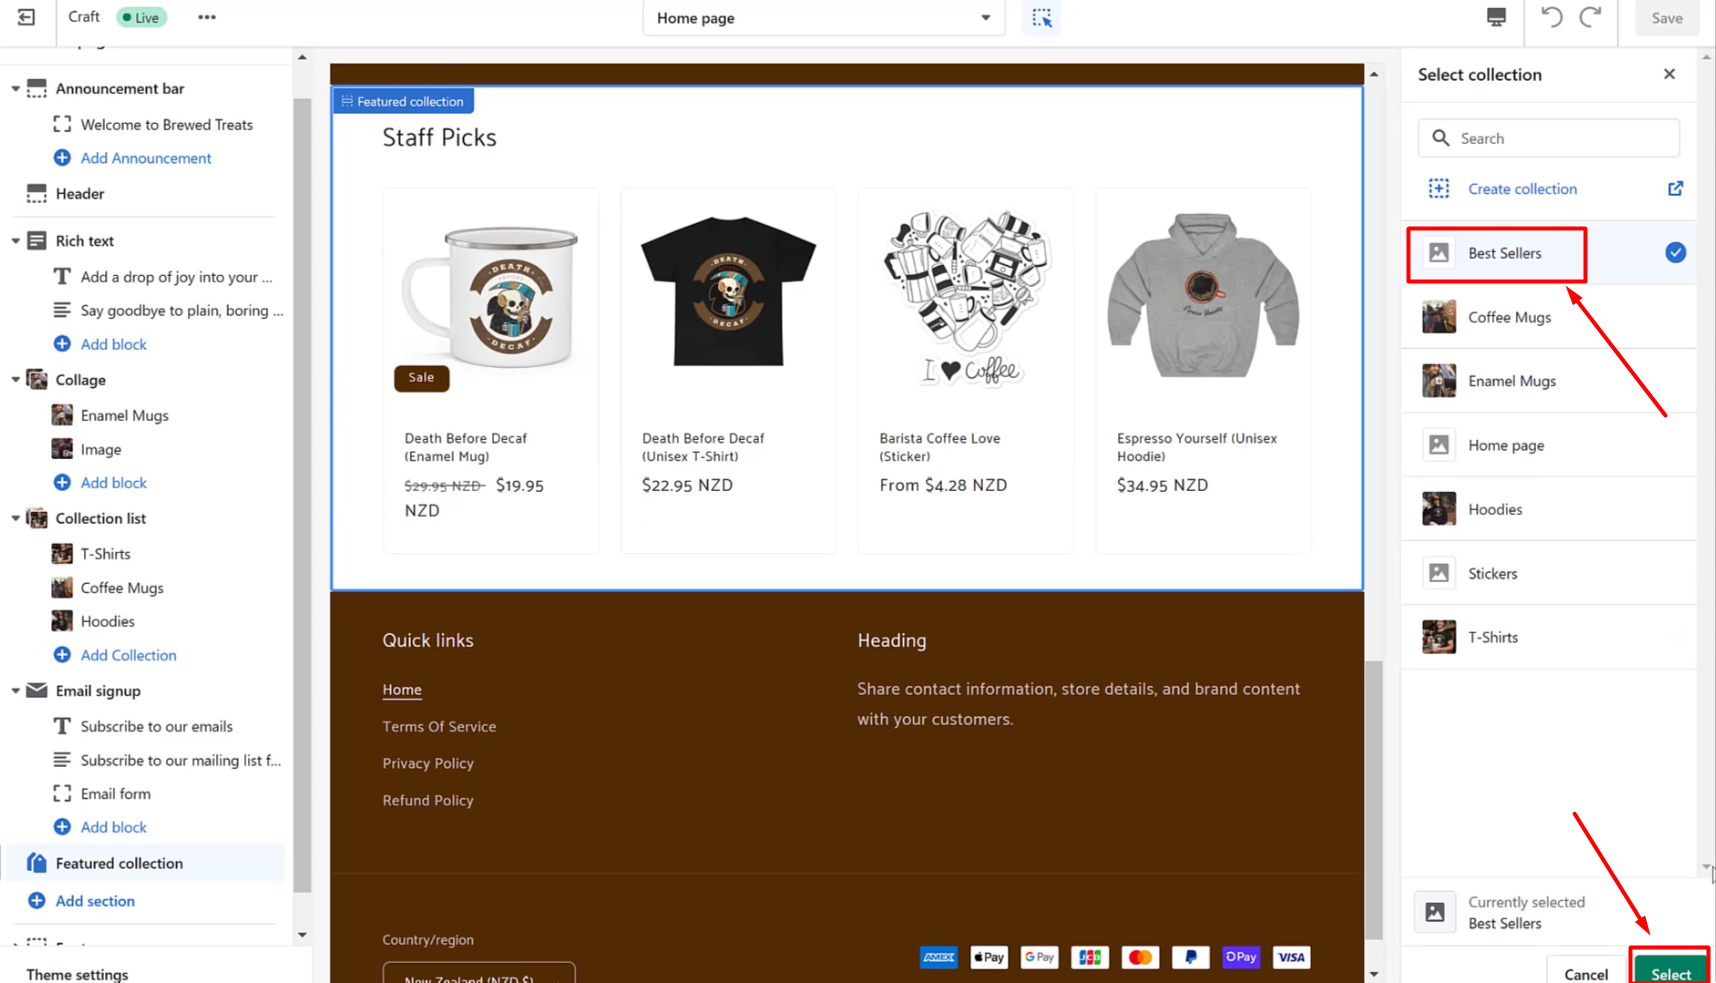
44. Now click the Best Sellers collection we created earlier and then click ‘Select’.
45. Click on the Featured Collection section label and drag it to be between the Collage section and the collection list section.
46. Click on Email Signup, click on the heading for that section and feel free to edit it in the text box at the right side of the editor window.

47. Go to the Email Signup subheading section and click it. Then edit the text as how you want it to show in your homepage Email Signup section.
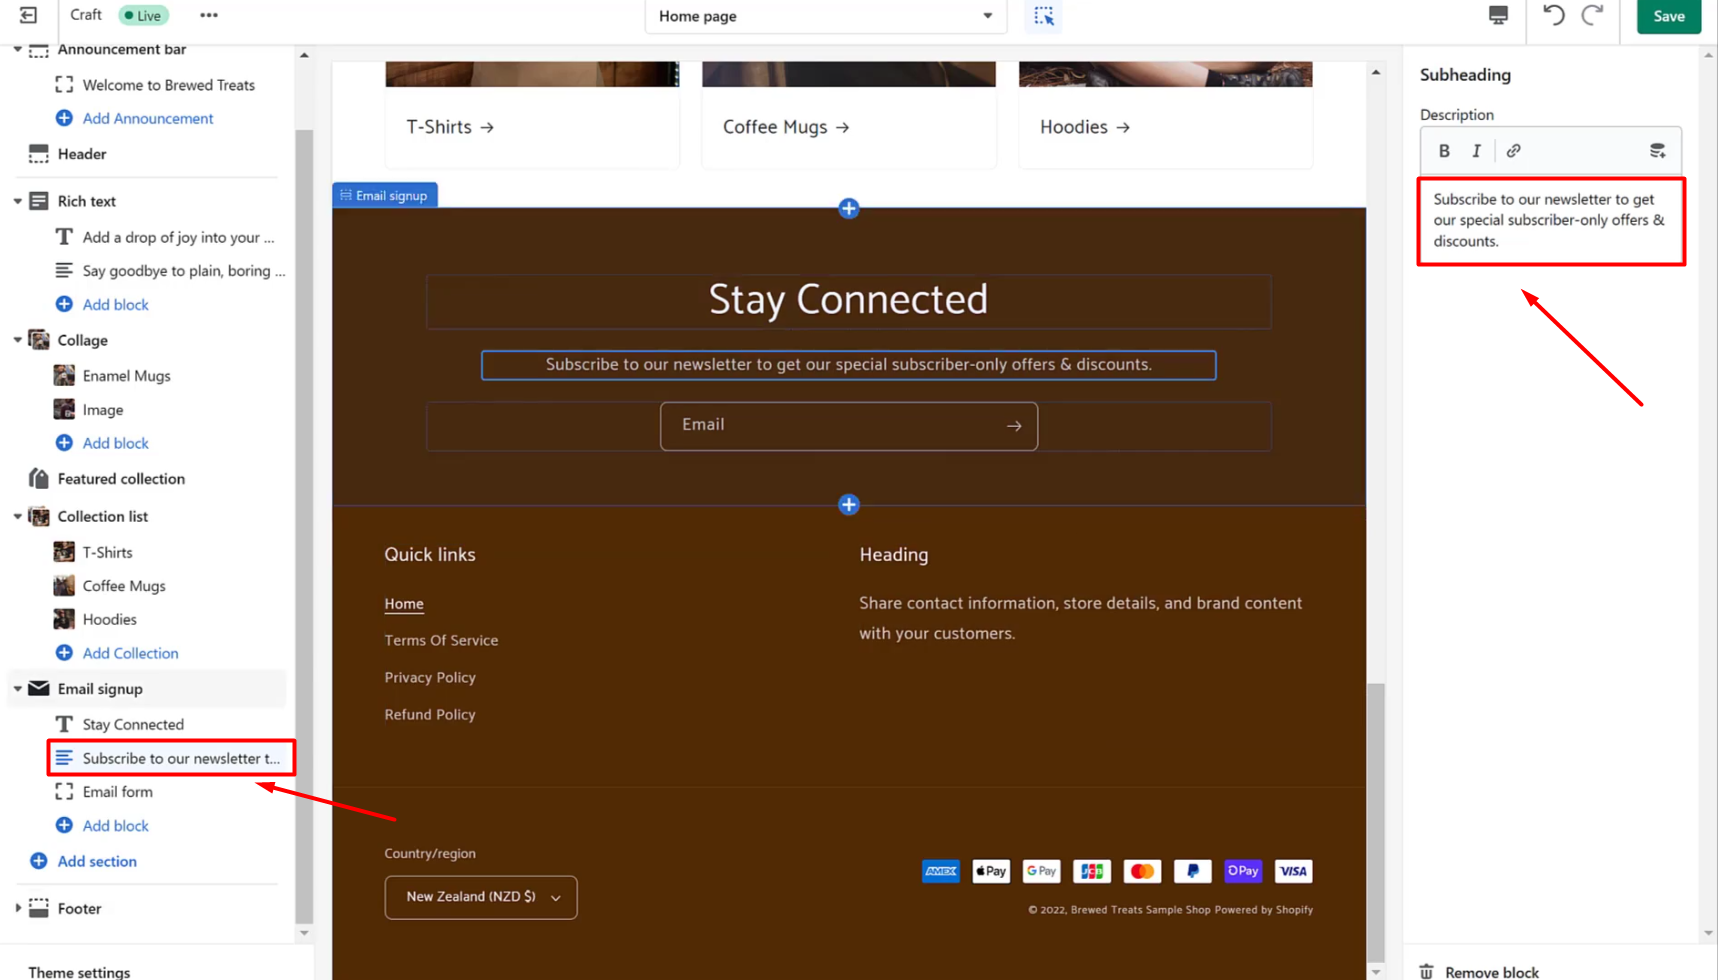
48. Now go to the Footer Section and edit the Heading and Subtext for that one. Then click ‘Save’.

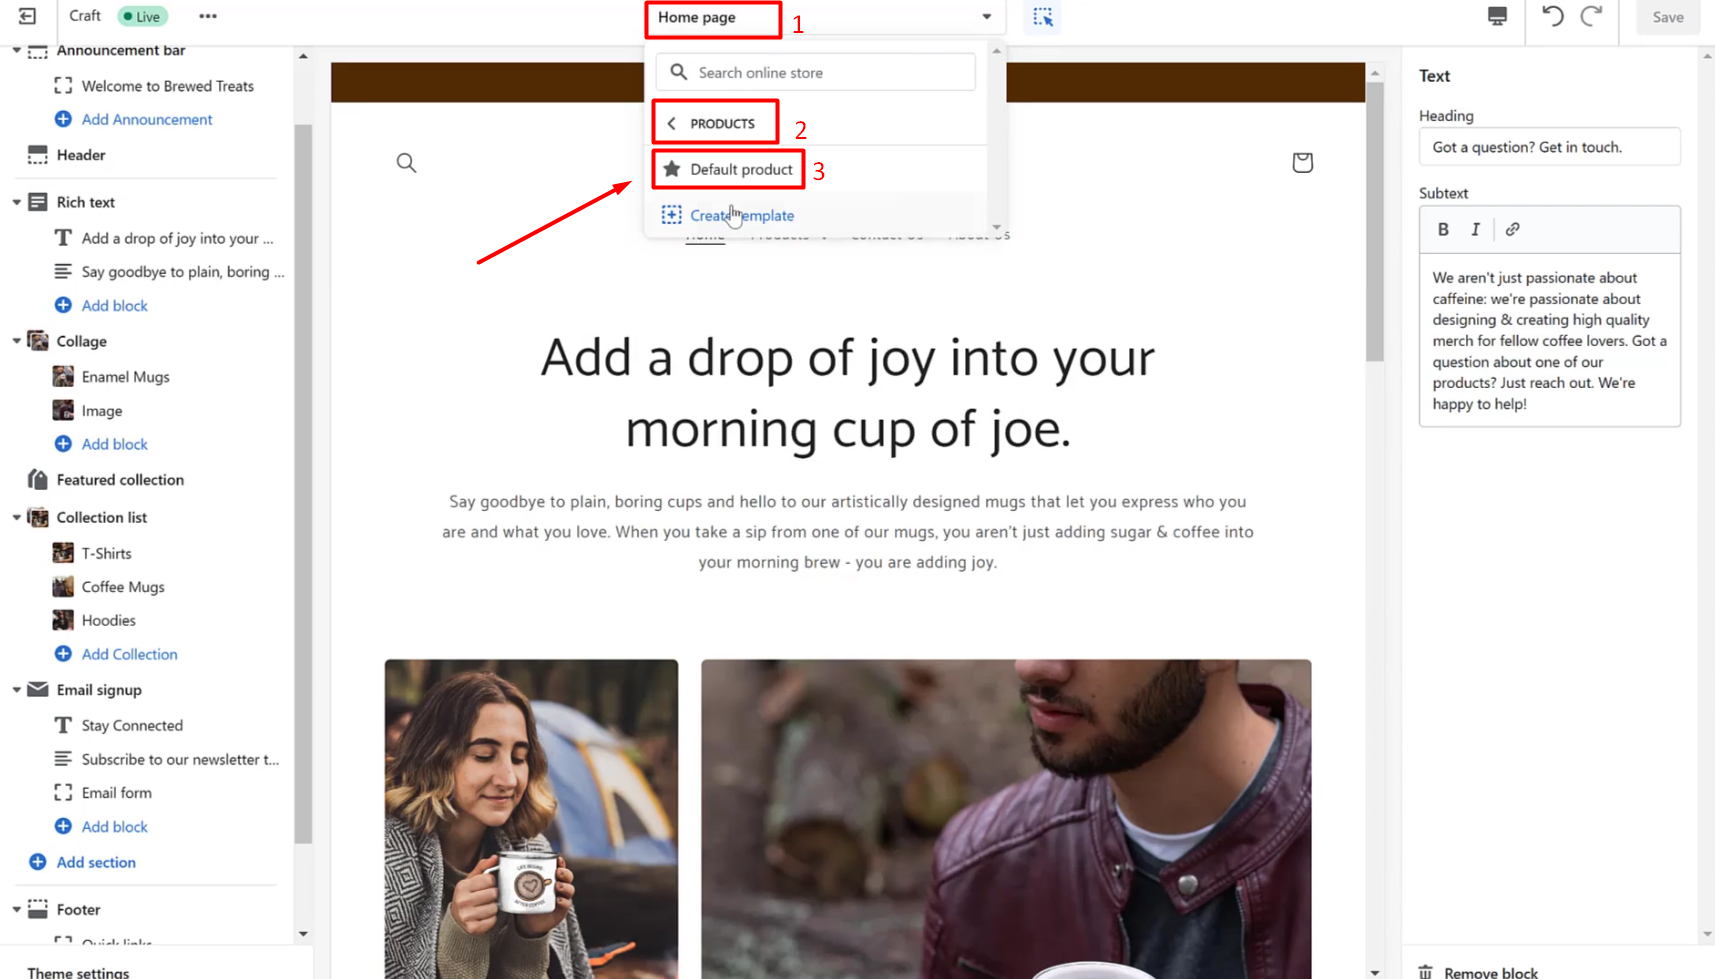
49. Go to the section selector and select ‘Products.’ Then click ‘Default product’.
50. Next, click on each of these blocks (Materials, Dimensions and Care Information) and remove each block.
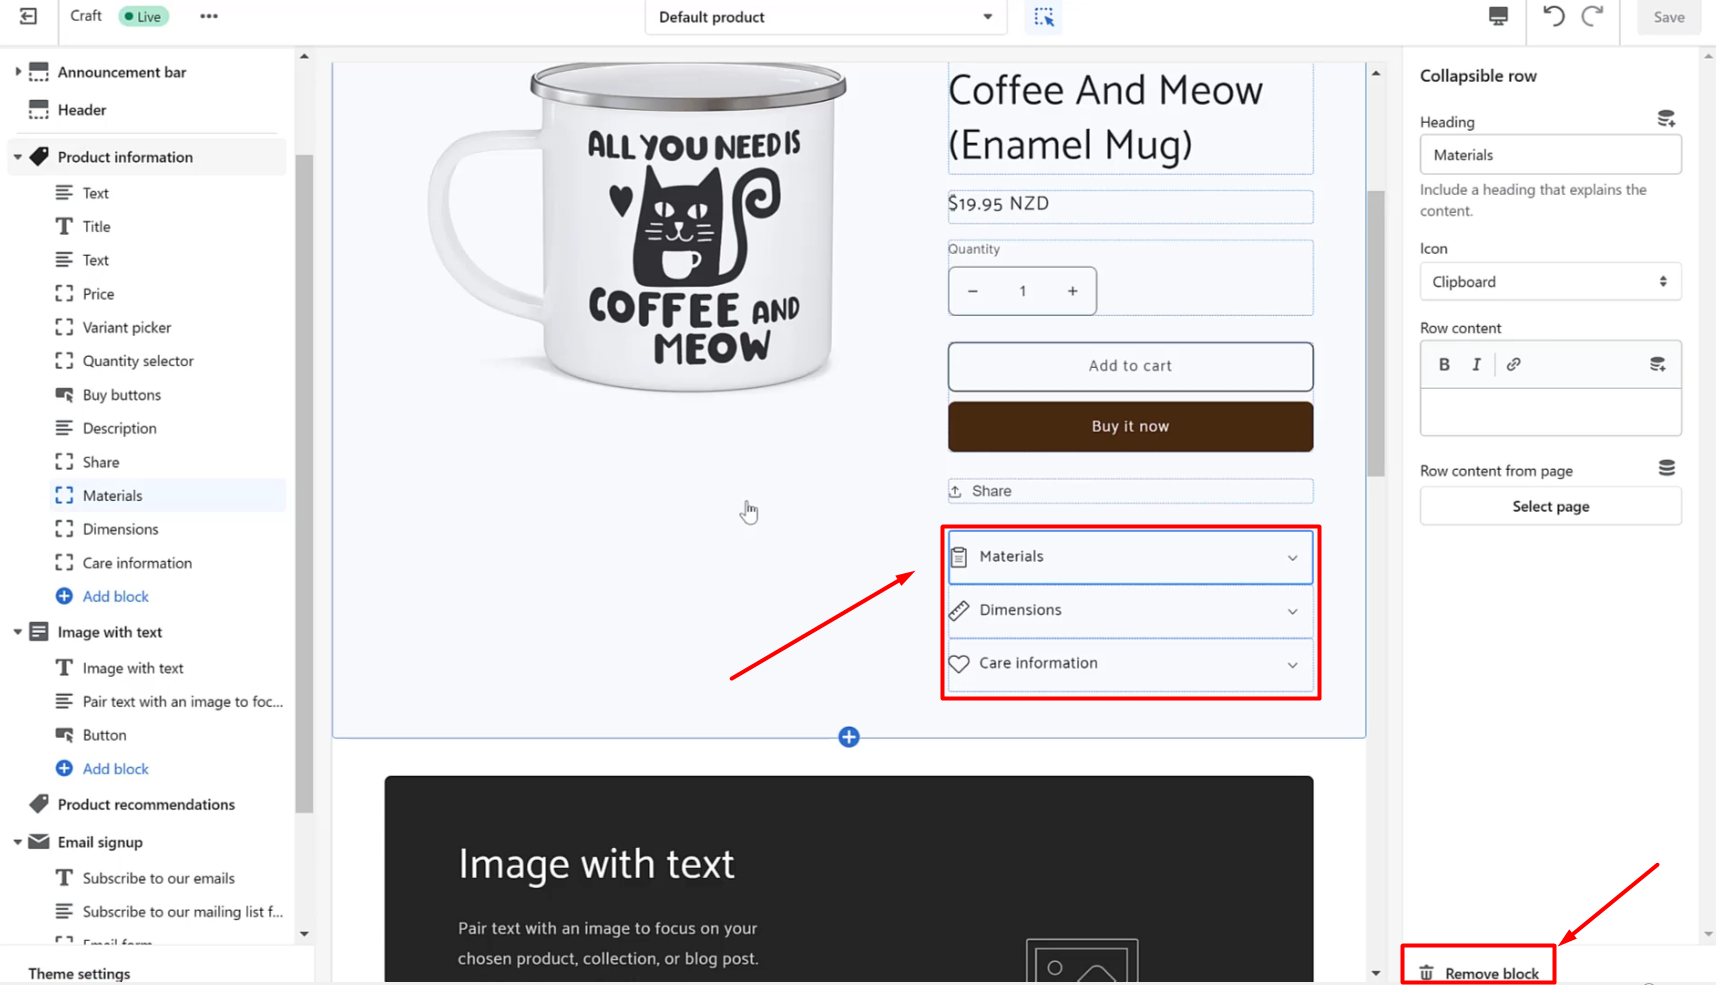
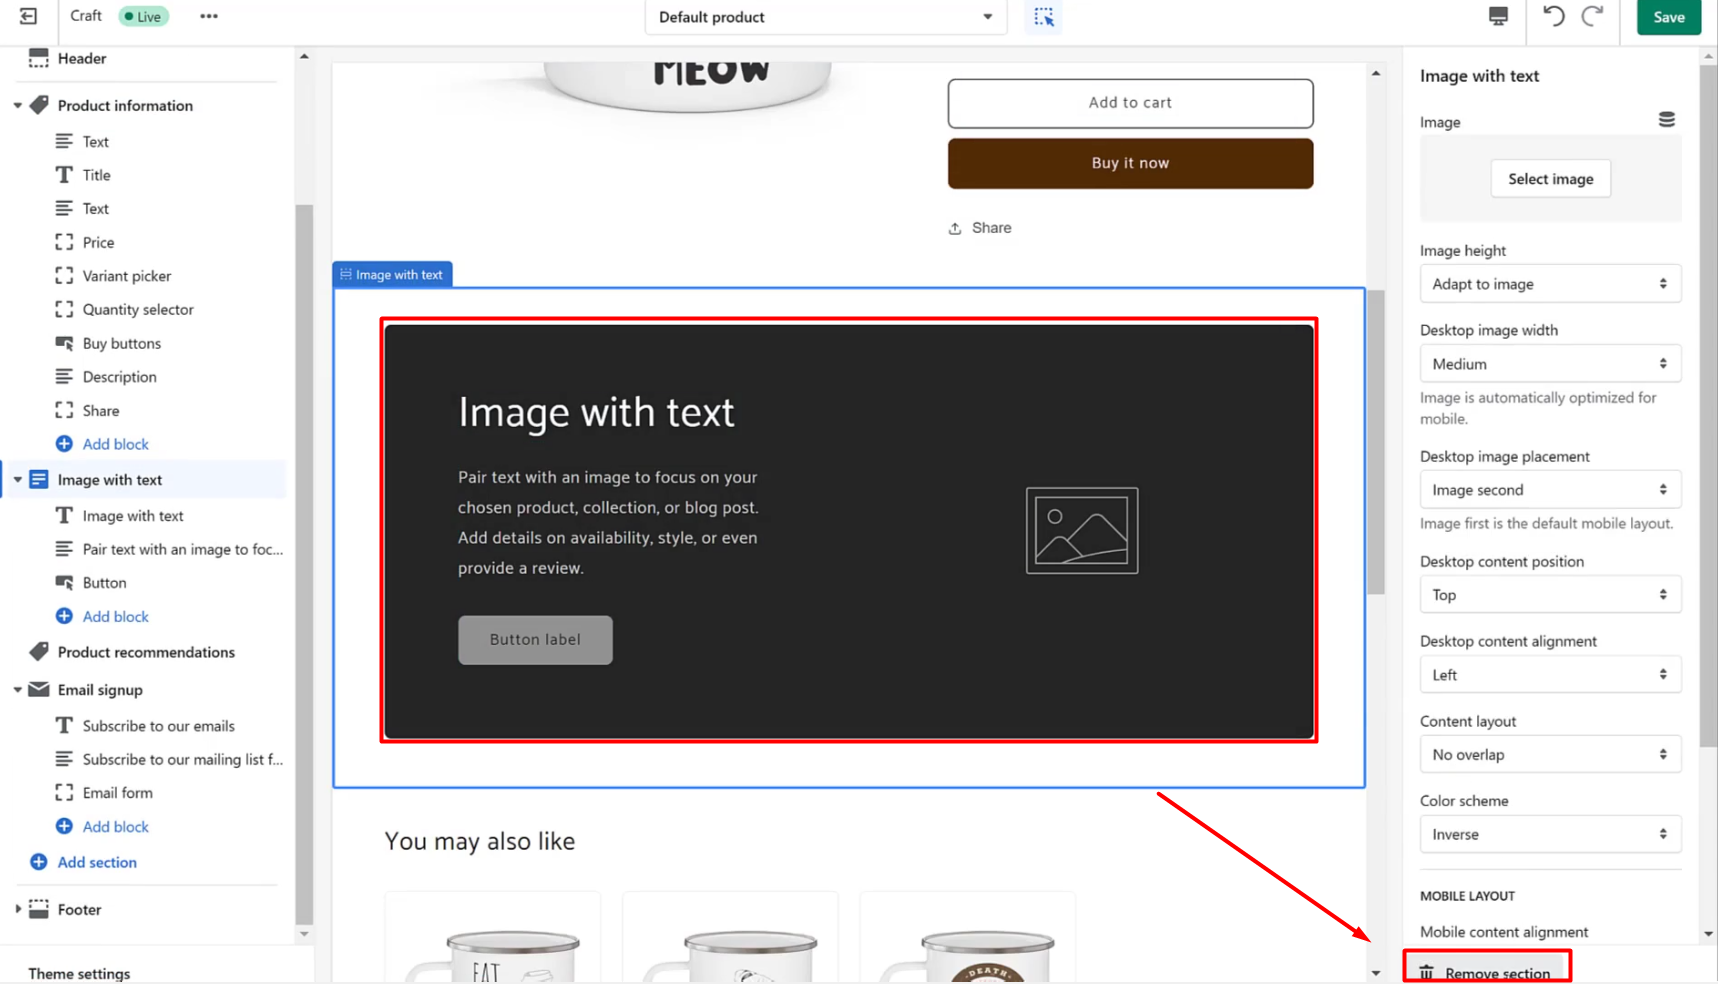
51. Now click on the Image with Text section and click ‘Remove section’. Click ‘Save’.
And that’s it! You have successfully edited your Homepage and Product Pages
